Reviewing Identifications
SKIP AHEAD TO
Change the size of the thumbnail image
Change the number of thumbnail images displayed per page
Approve and edit identifications
Adjust the brightness, contrast or saturation of an image
Favorite, or "Highlight", an image
Edit an existing ID within a burst
Bulk selections within a burst
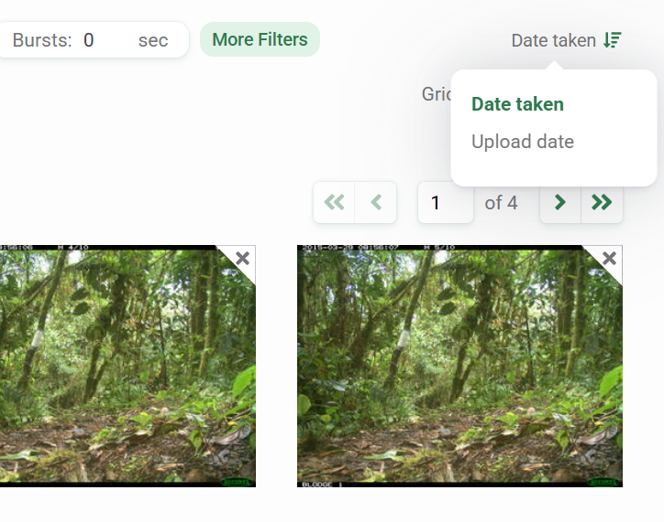
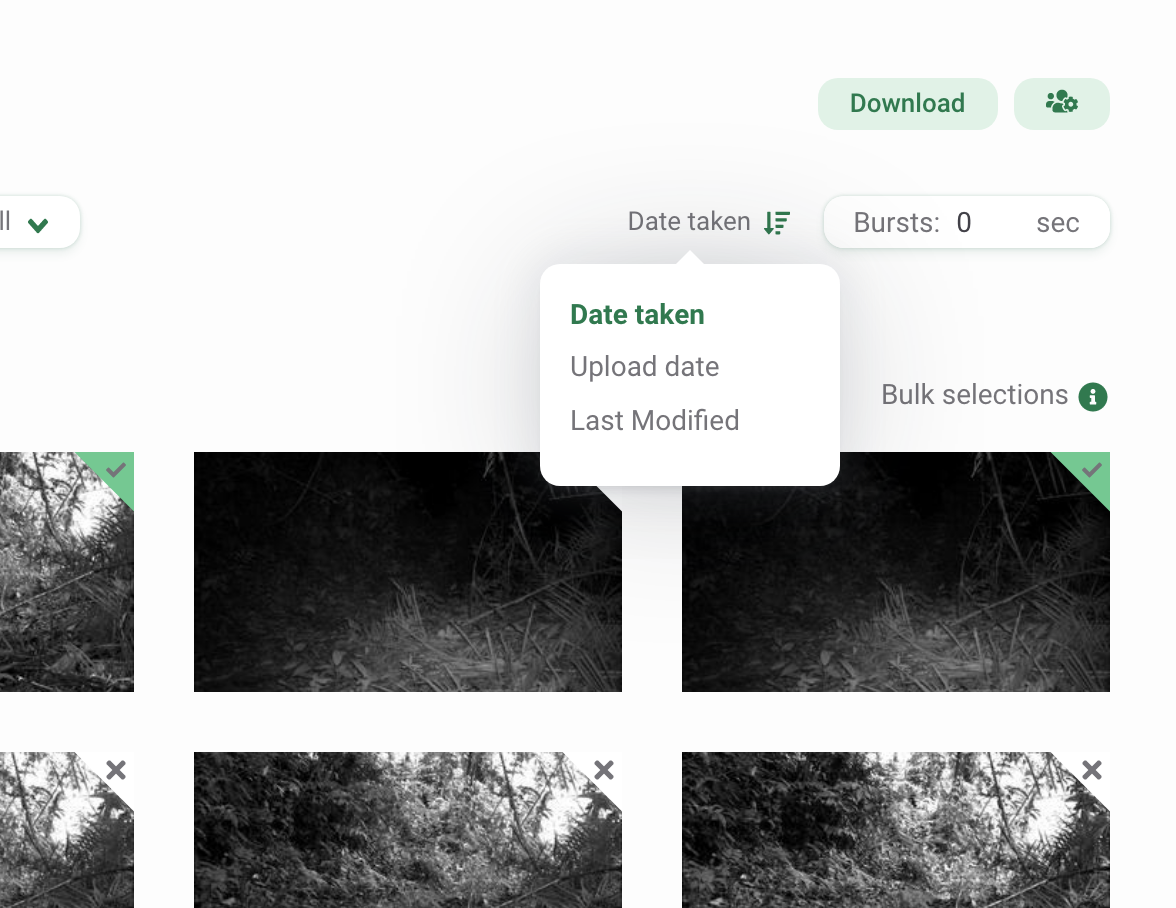
Sort images
By default, images are sorted by Date taken. You can also sort images by the Upload date or Last Modified (the latter is only available in the Catalogued tab).
To change the sort by ascending or descending date, click the green arrow next to the sort options text.
Sort options in the Identify tab
Sort options in the Catalogued tab
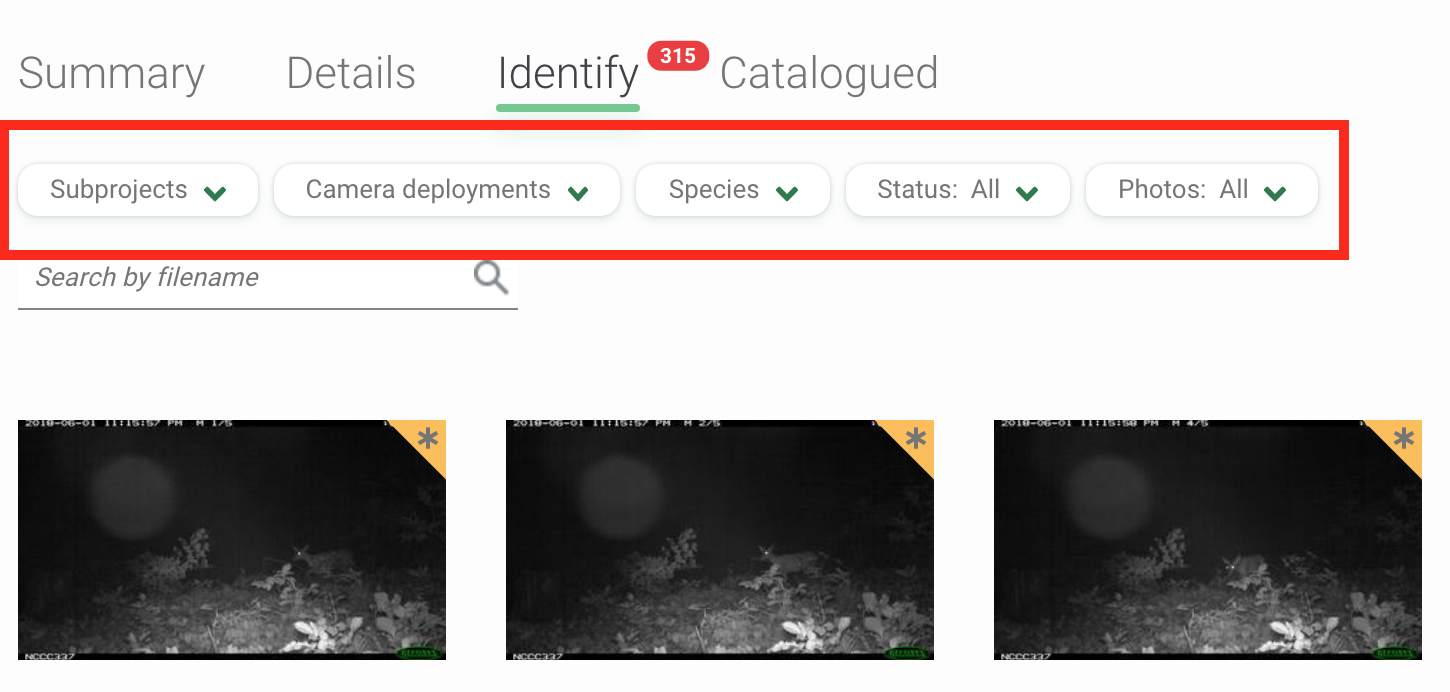
Use filters
Filters make it easy to focus on a smaller subset of images, whether by deployment, species identification or blanks. You can filter images with these options:
- Subprojects: A grouping of camera deployments. Learn more about Subprojects.
- Camera Deployments: The setup of a camera at a location during a specific period of time. Learn more about Camera Deployments.
- Taxonomies: Includes all taxonomies, including human categories, objects (e.g., bicycle, car), higher-level identifications (e.g., class, order, family), and the tag No CV Result. The No CV Result tag is returned when the model's confidence is below the threshold set for a species identification (65% threshold) or a blank identification (95% threshold).
- Taggers (in the Catalogued tab only): Who annotated the images
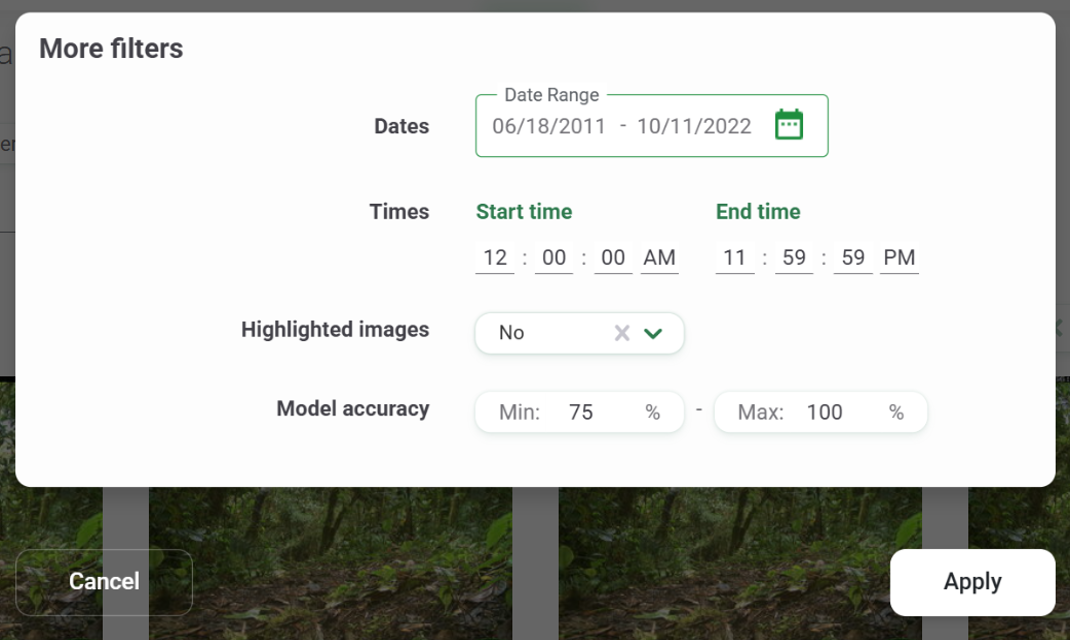
- Dates: A range of dates when the images were taken
- Times: Start and end times when the images were taken
- Status: Images that were marked as blank or not blank
- Bursts: Enter a time interval (0-600 seconds) between an image and a subsequent image. Learn more about using bursts.
- Highlighted images: Images that were highlighted/favorited
- Model accuracy (in the Identify tab only): Each AI object identification suggestion in an image will have a confidence score based on the score the model returns for the top-most predicted class on a scale of 0 to 100%. Select a minimum and maximum confidence score.
Change the size of the thumbnail image
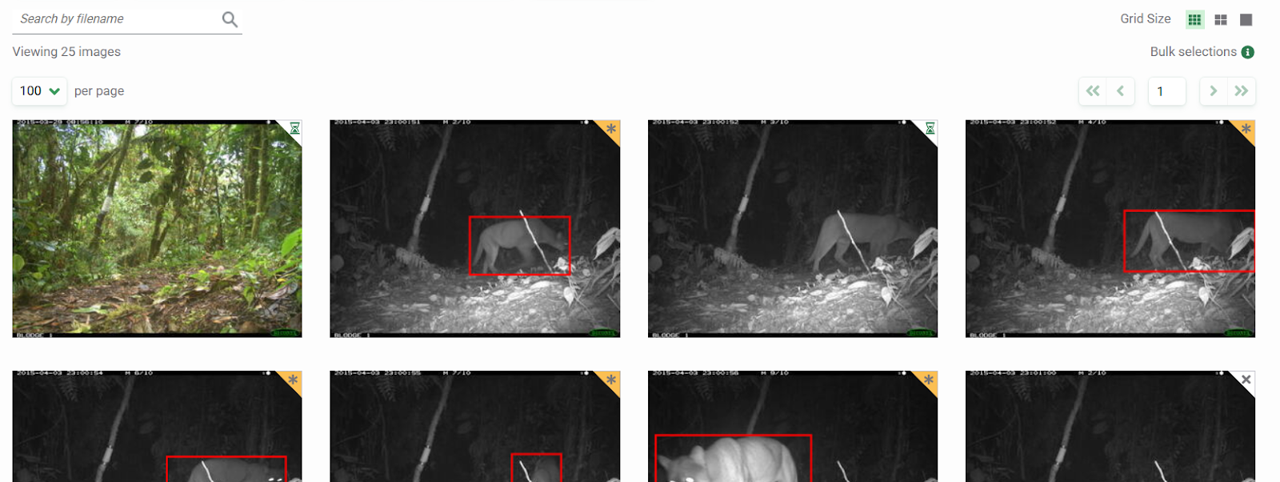
By default, images are displayed in a small grid format. To increase the size of the thumbnail image, select the icon with four squares next to Grid size.

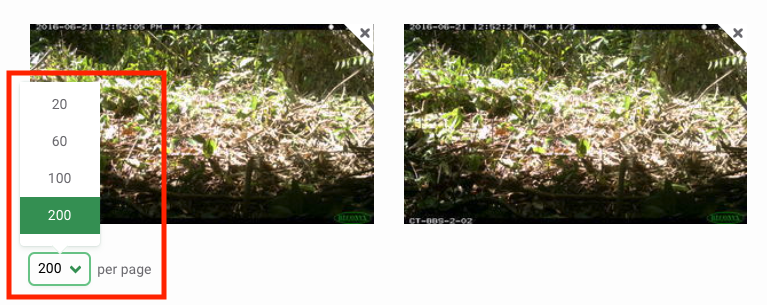
Change the number of thumbnails displayed per page
Select the number of images displayed on each page. Scroll to the bottom of the Identify or Catalogued page, and, on the left side of the screen, you'll find a drop-down menu with options to view 20, 50, 100, or 200 images per page.
Review identifications
All images reviewed and assigned an object identification by artificial intelligence will have a gold marker in the top right-hand corner of the image. Blank images will have an X marker in the upper right corner. Images with an hourglass icon in the upper right corner indicate images still in the queue to be identified by the AI model.
To review an image, click on the thumbnail. A screen will open displaying a larger preview of the image. To the right of the image, you’ll see:
- Author: All images that pass through the computer vision model will display the author as Computer Vision. Once a user approves or edits an identification, that user's name will be displayed as the Author.
- Identification Date: The date the identification was made. If an identification is approved or edited, the identification date and time will change.
- Identification: For any animal ID, the Class, Order, Family, Genus and Species will be displayed here. Objects, non-wildlife IDs and human categories will be displayed here by common name. Learn more about what is included in the Wildlife Insights taxonomy. Note: You can change your account preferences to display either common or scientific names.
- Count: The number of individuals associated with the identification. By default, the count is prepopulated by the number of bounding boxes identified in an image.
- Computer Vision Confidence. The computer vision model's confidence score associated with its identification. To learn more about how this number is determined, read more about Wildlife Insights's AI model.

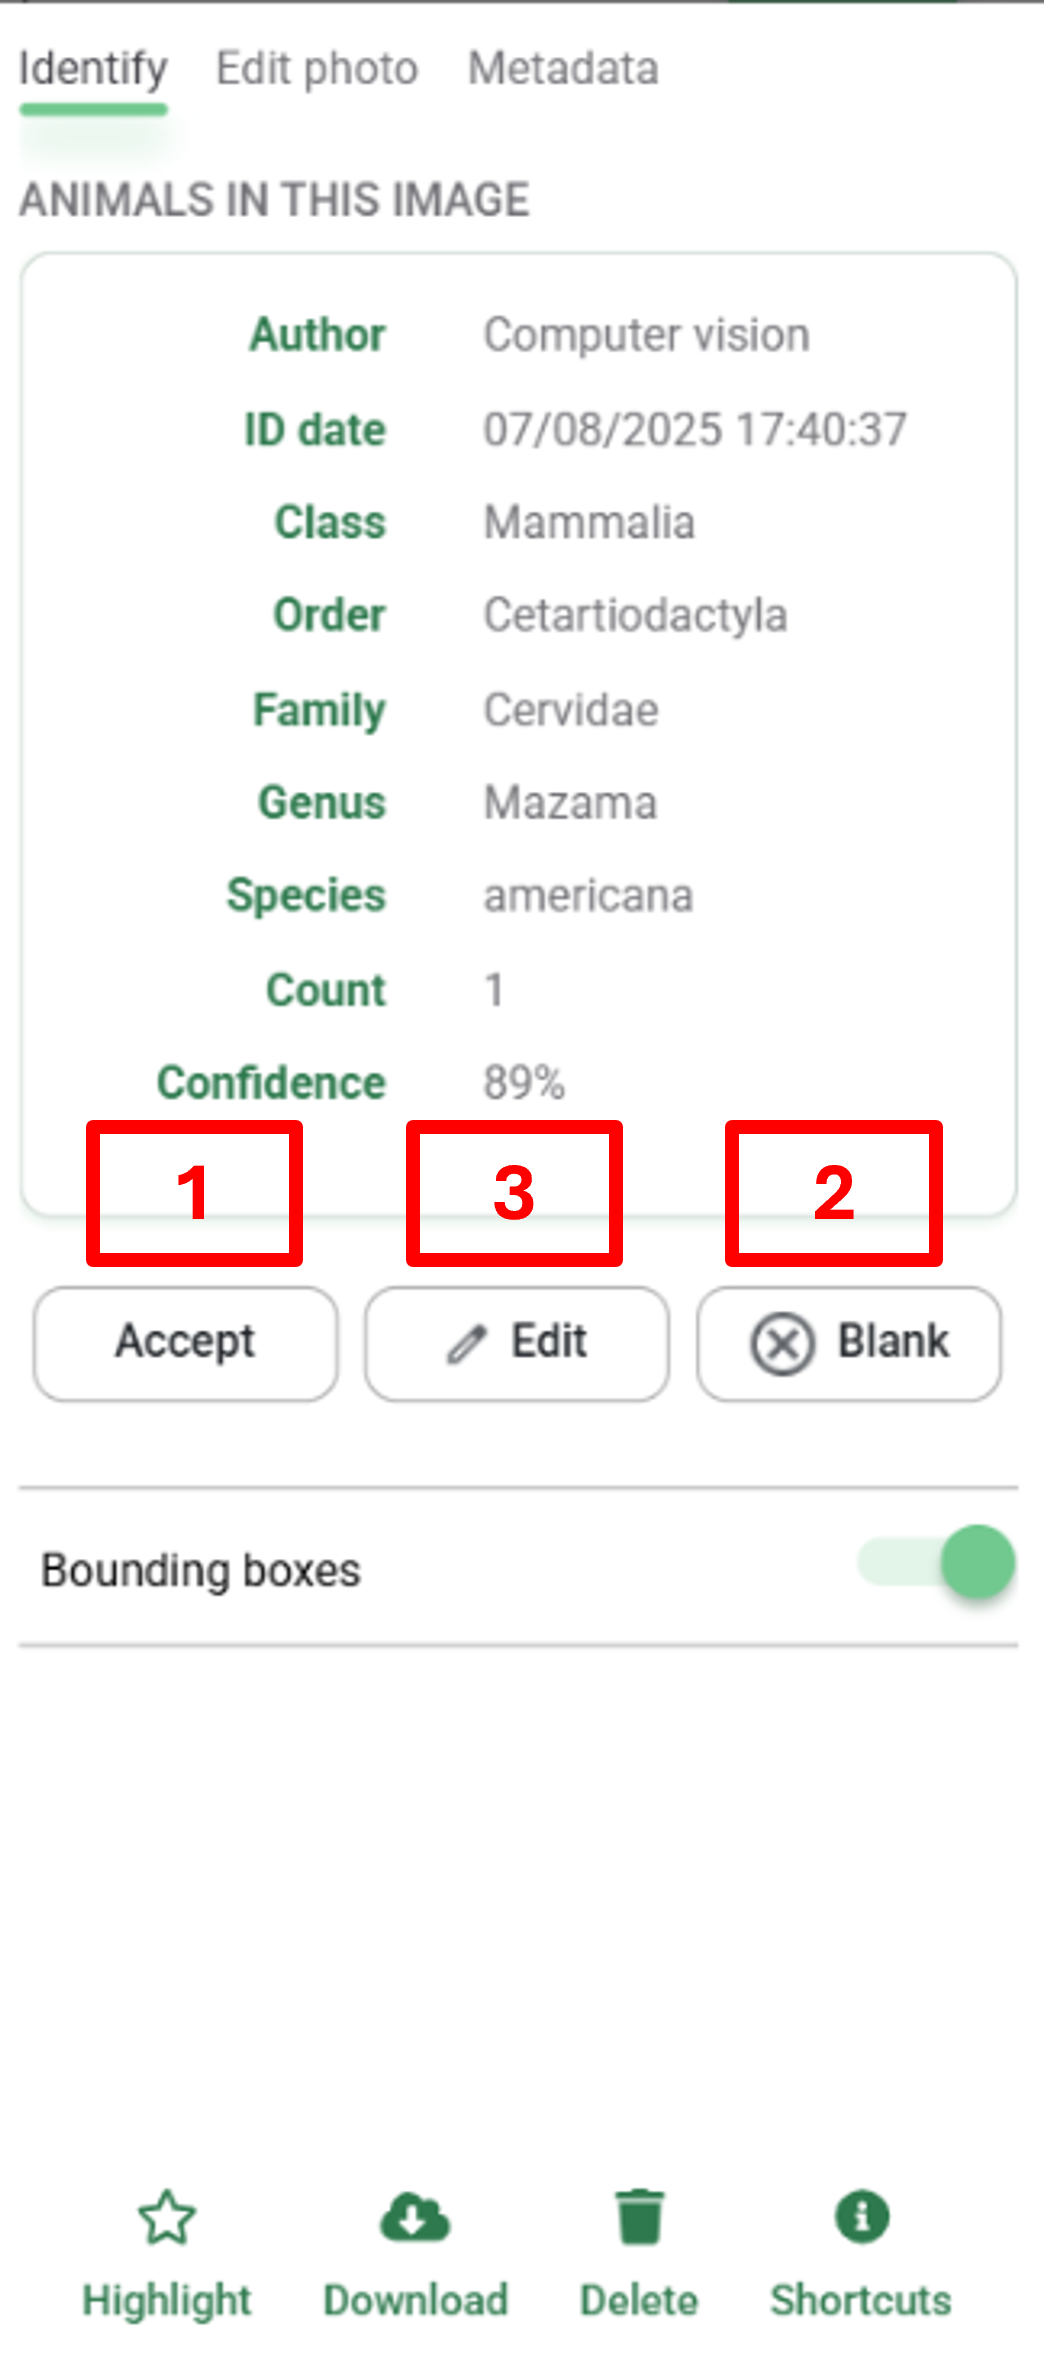
Approve and edit identifications
- Accept an identification: To accept the identification provided by computer vision, click the Accept button.
- Mark as blank: To mark an image as blank (i.e., there are no objects or animals in the image), click the Mark as blank button.
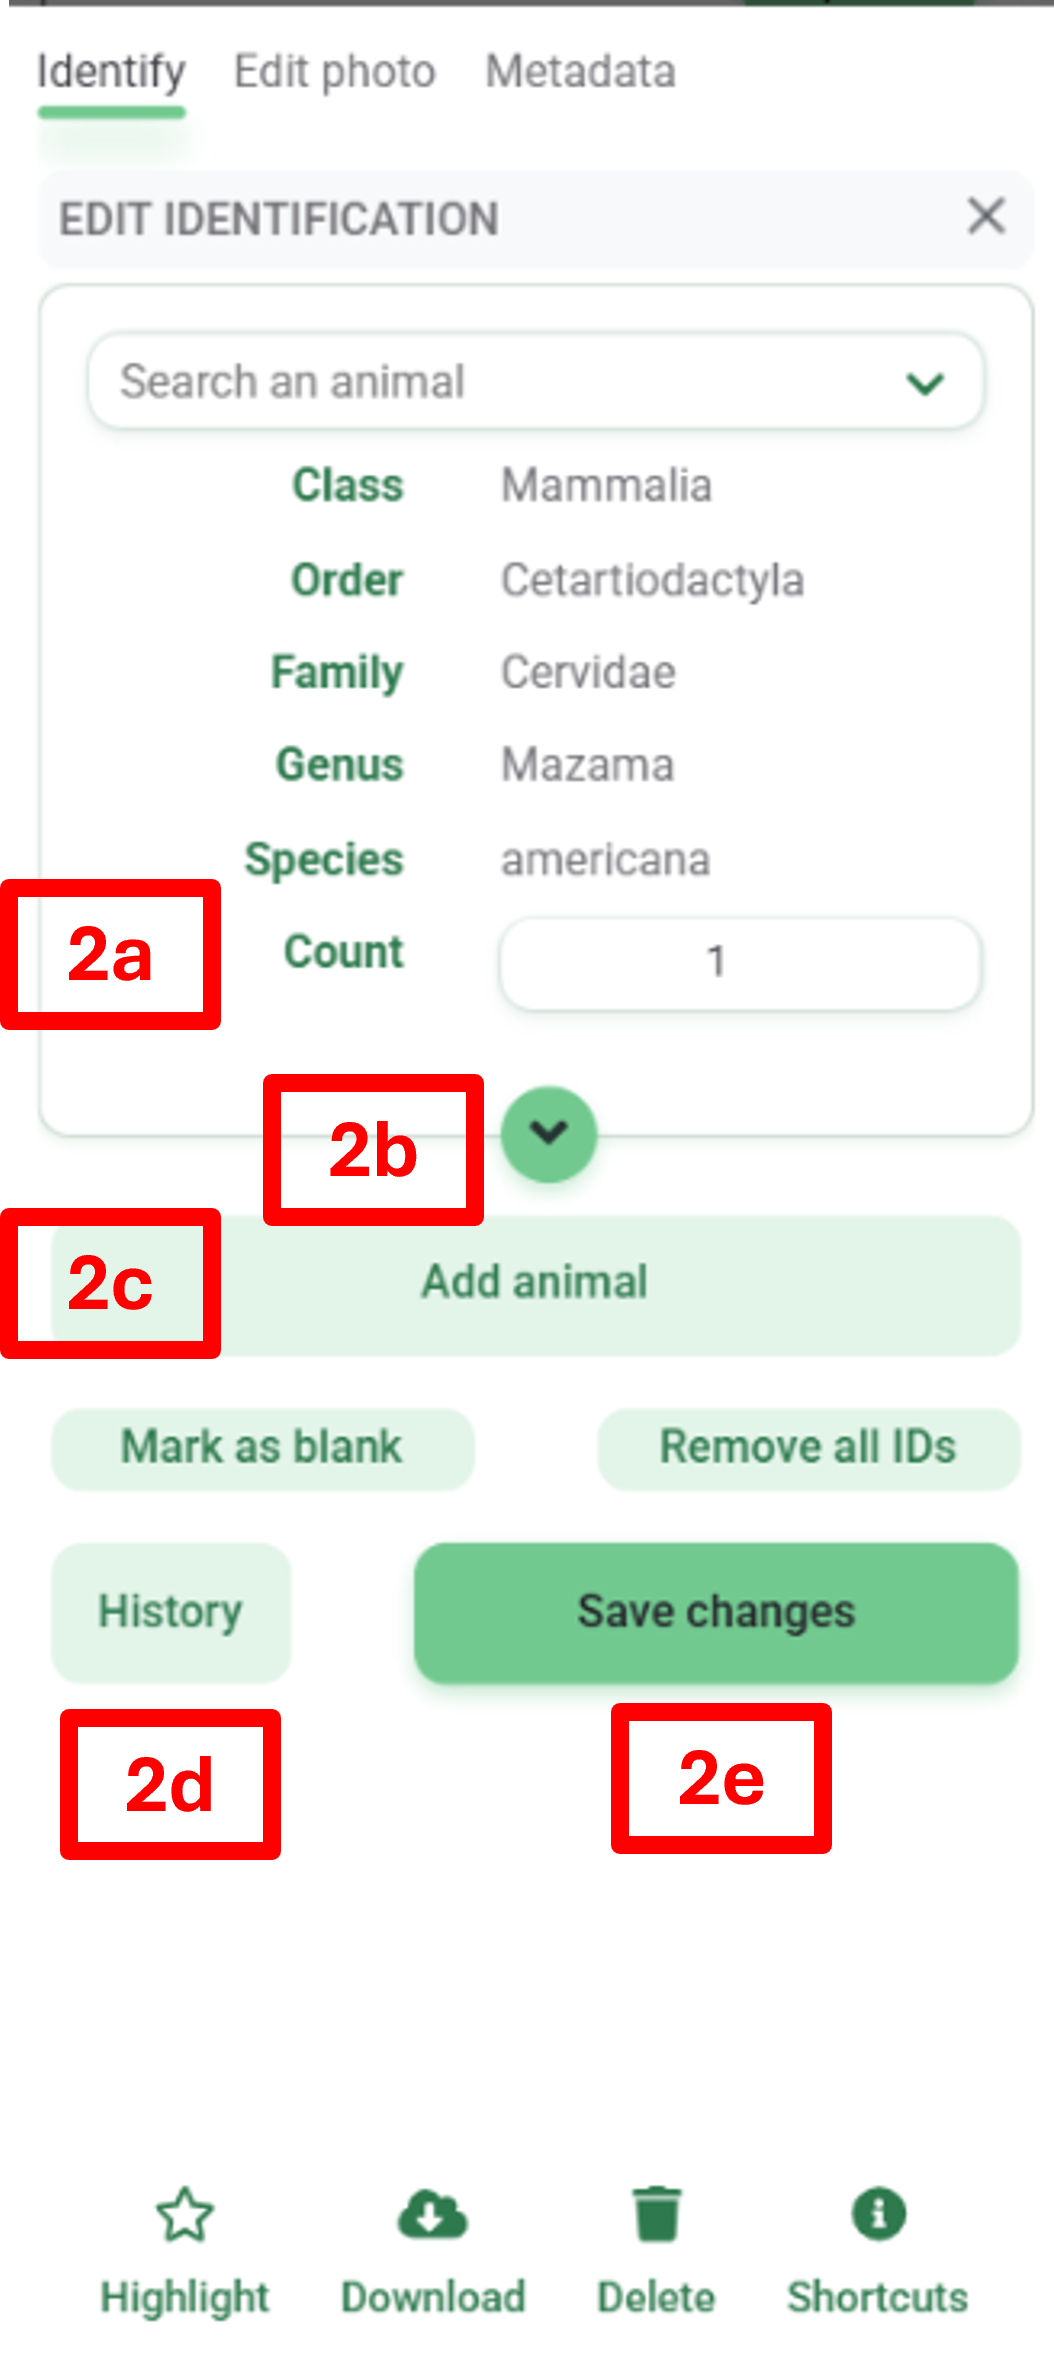
- Edit the identification: To edit the identification, click on the Edit button. This will open a new screen that allows you to search for the correct species name (see the screenshot below on the right).
- To add multiple animals of the same species, enter the number in the Count field.
- To add more details about the identification (i.e., age, sex, markings), click the circular button with a downward-facing arrow below a species identification. When adding values for markings, behavior, or remarks, the system will remember and suggest previously added values.
- To add an additional identification, click the Add animal button.
- To view the history of identifications made, click the History button. You'll see a list of identifications, the user associated with the identification, and the time the identification was made.
- Click on the Save changes button to save your edits.
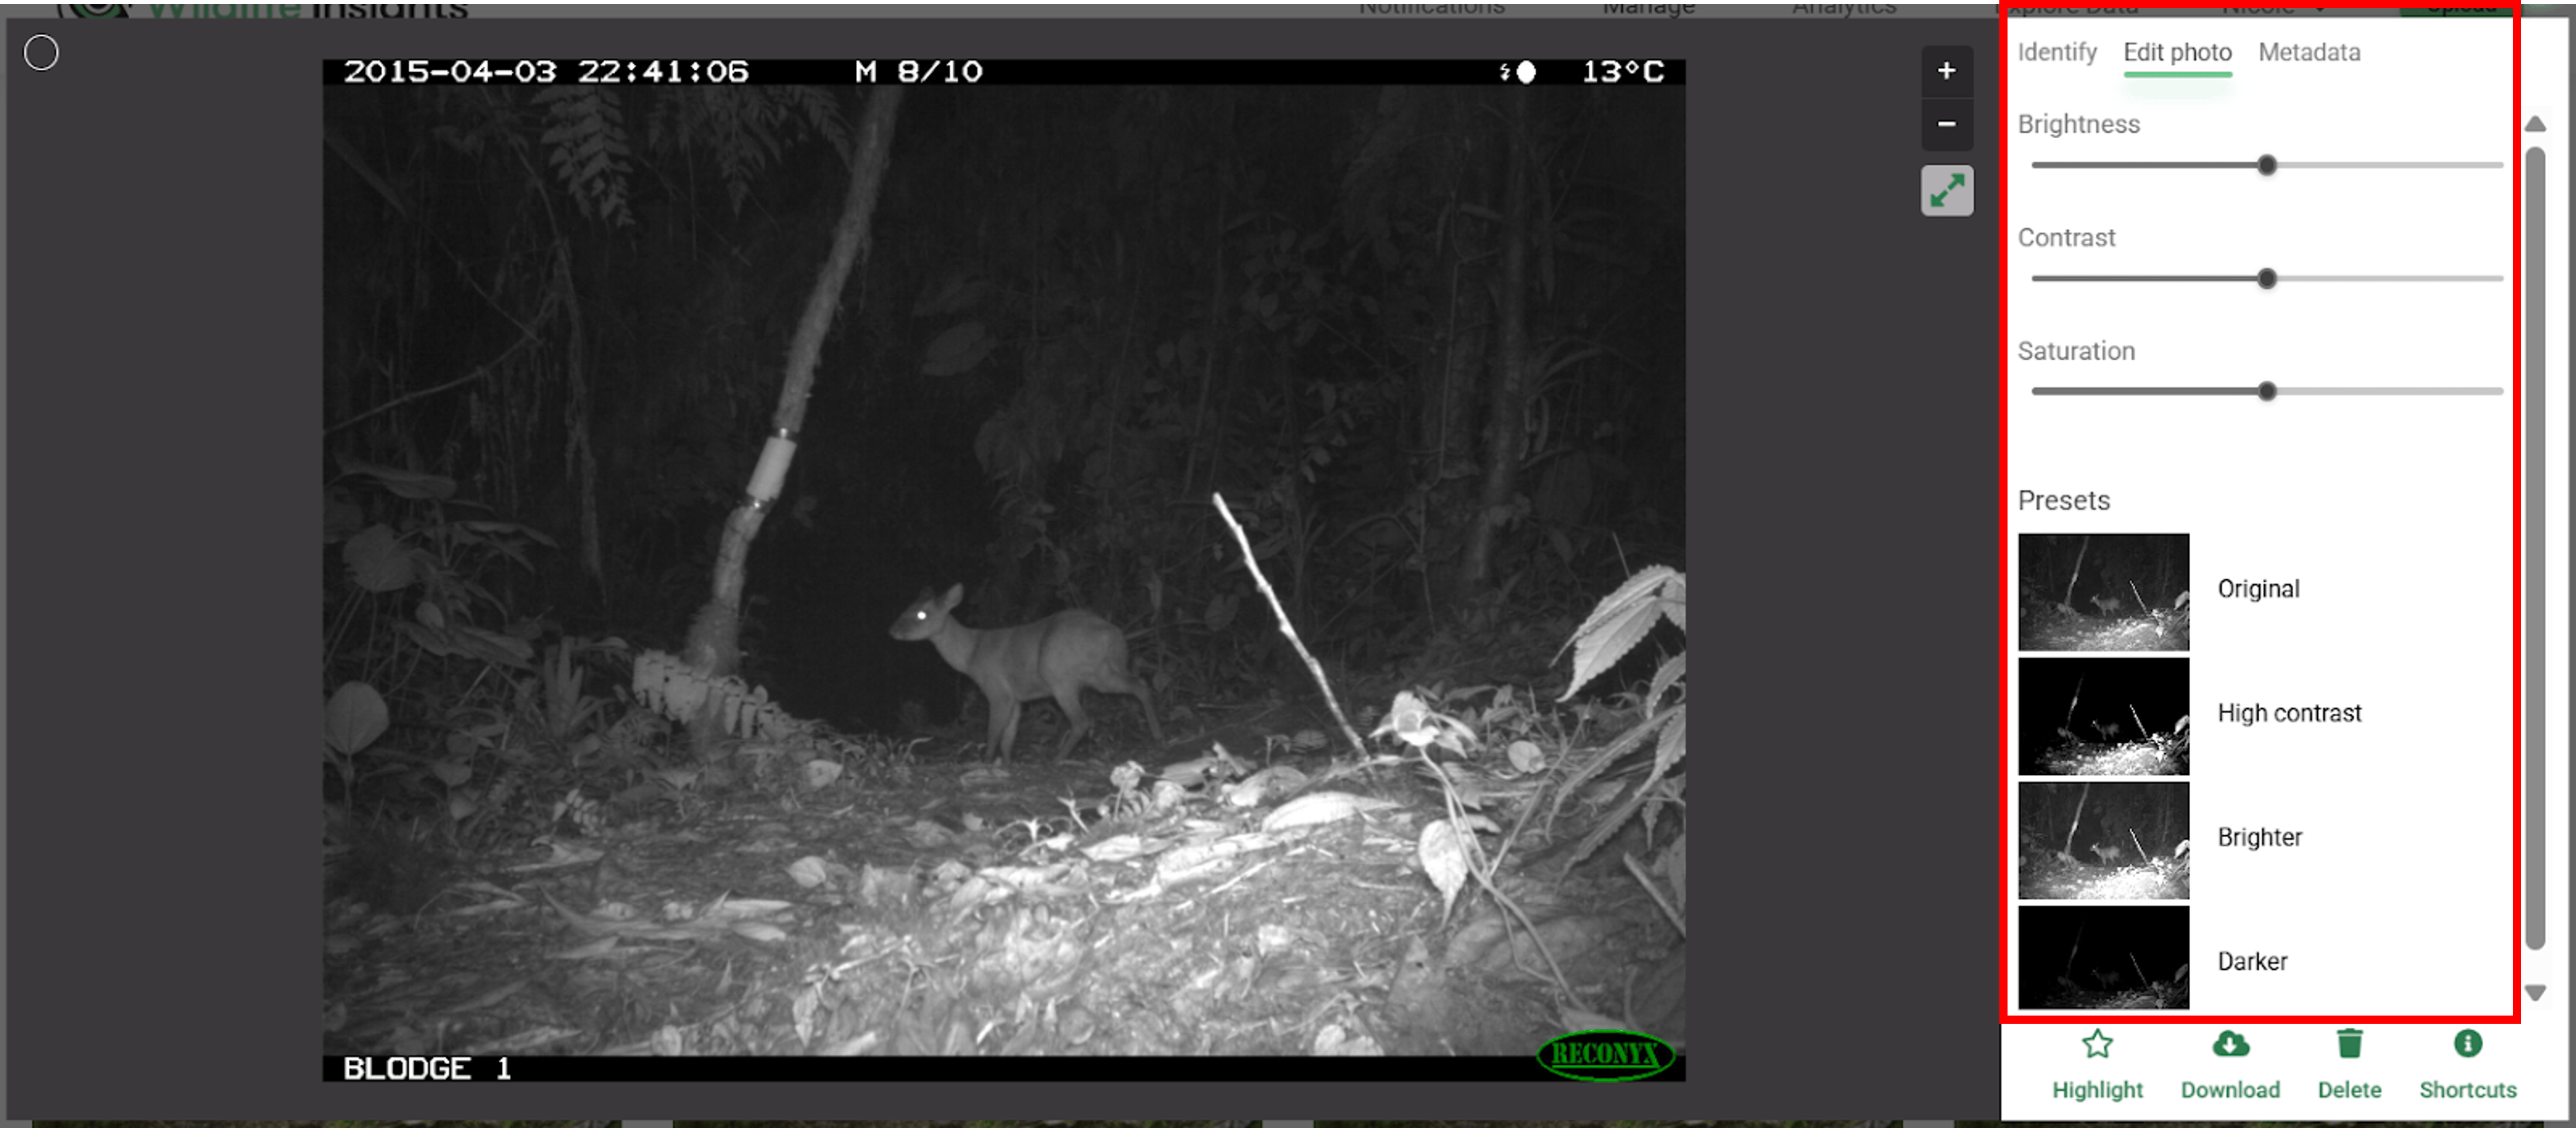
Adjust the brightness, contrast or saturation of an image
If your images are too dark, too light, or anything in between, you can use the Edit Photo tools to get a clearer picture of what’s in an image. On the top of the identification panel, click the Edit Photo tab and adjust the sliders for brightness, contrast or saturation or choose one of the presets available.
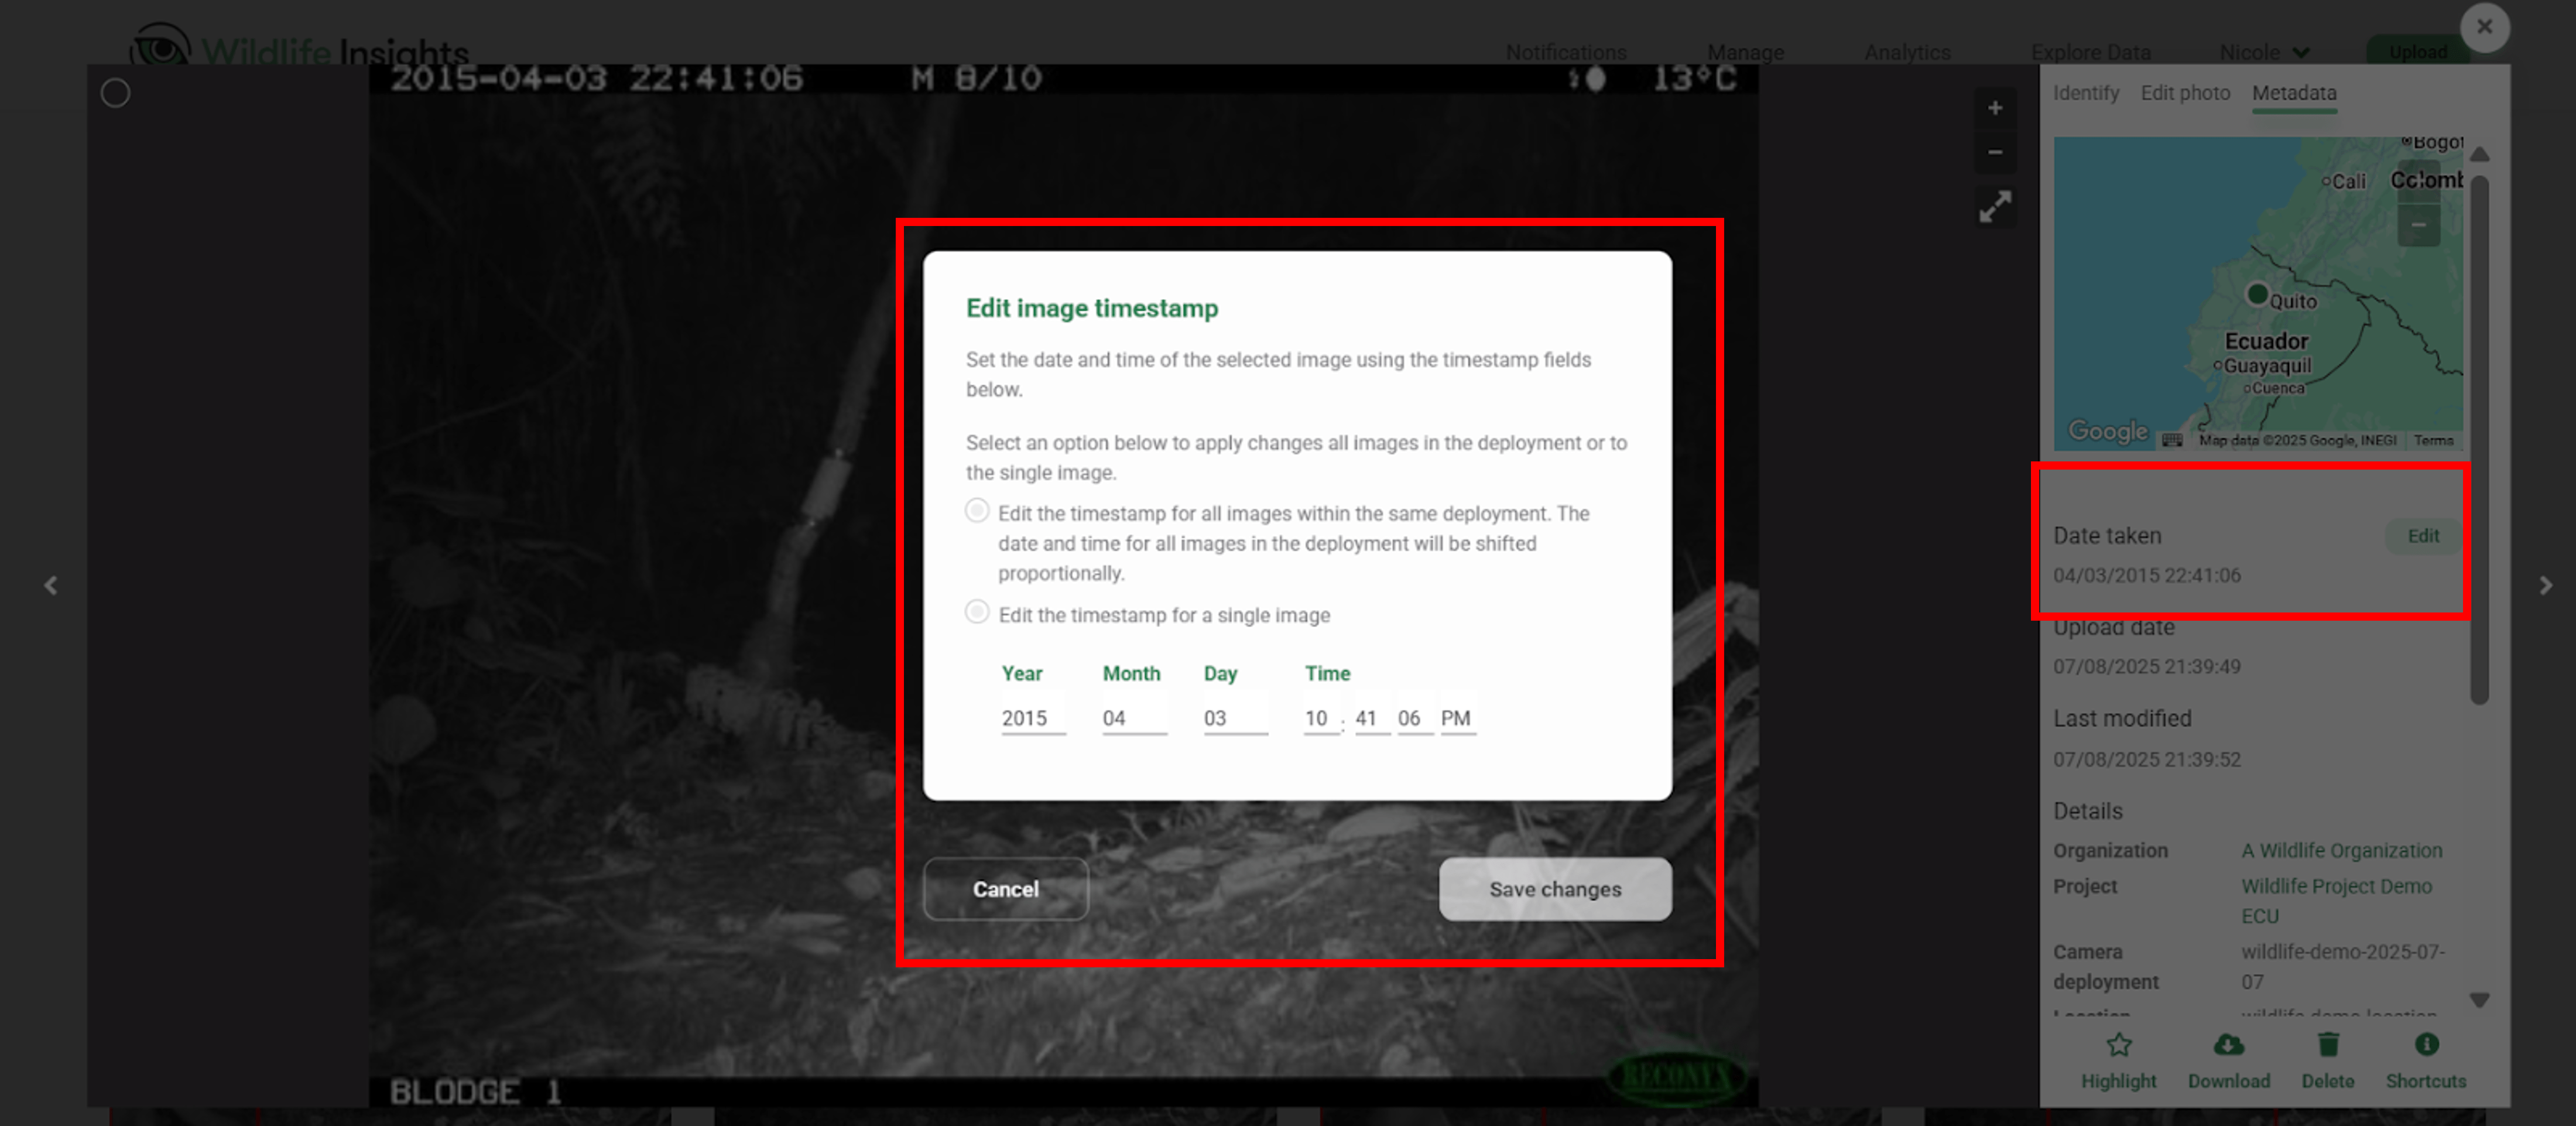
Correct image timestamp
You can fix incorrect date/time stamps caused by camera failures or metadata issues. Navigate to the Metadata tab of any individual image and click Edit to change the date and time taken. You can apply the new date/time to the single image or update the date/time for all images within the same deployment. WARNING! For the latter, the timestamps of ALL OTHER IMAGES in the deployment will shift proportionally.
Favorite, or Highlight an image
When you’re viewing an image in the large preview mode, you can easily flag it as a favorite so you can quickly access it later! In the identification panel, click on the star icon above the word Highlight.
Note: All highlighted images will be available publicly on the Explore page.

Shortcut keys
You can use these shortcut keys to review images quickly:
Windows/Chrome OS/Linux | macOS | Action |
|---|---|---|
|
| Edit identification |
|
| Mark as blank |
|
| Accept identification |
|
| Apply the last saved identification |
|
| Accept bounding boxes |
|
| Save changes |
|
| Highlight an image |
|
| Move to the next image or group |
|
| Move to the previous image or group |
|
| Move to the next image within a burst |
|
| Move to the previous image within a burst |
|
| Zoom in |
|
| Zoom out |
Bulk actions
Quickly select multiple images in the thumbnail view by using these common shortcuts:
Windows/Chrome OS/Linux | macOS | Action |
|---|---|---|
|
| Select all images on a page |
|
| Add or remove from a selection |
|
| Select multiple images by drawing a selection box over multiple thumbnails |
|
| Select a range of images by shift+clicking on one thumbnail, then Shift+clicking on another to select all images in between them |
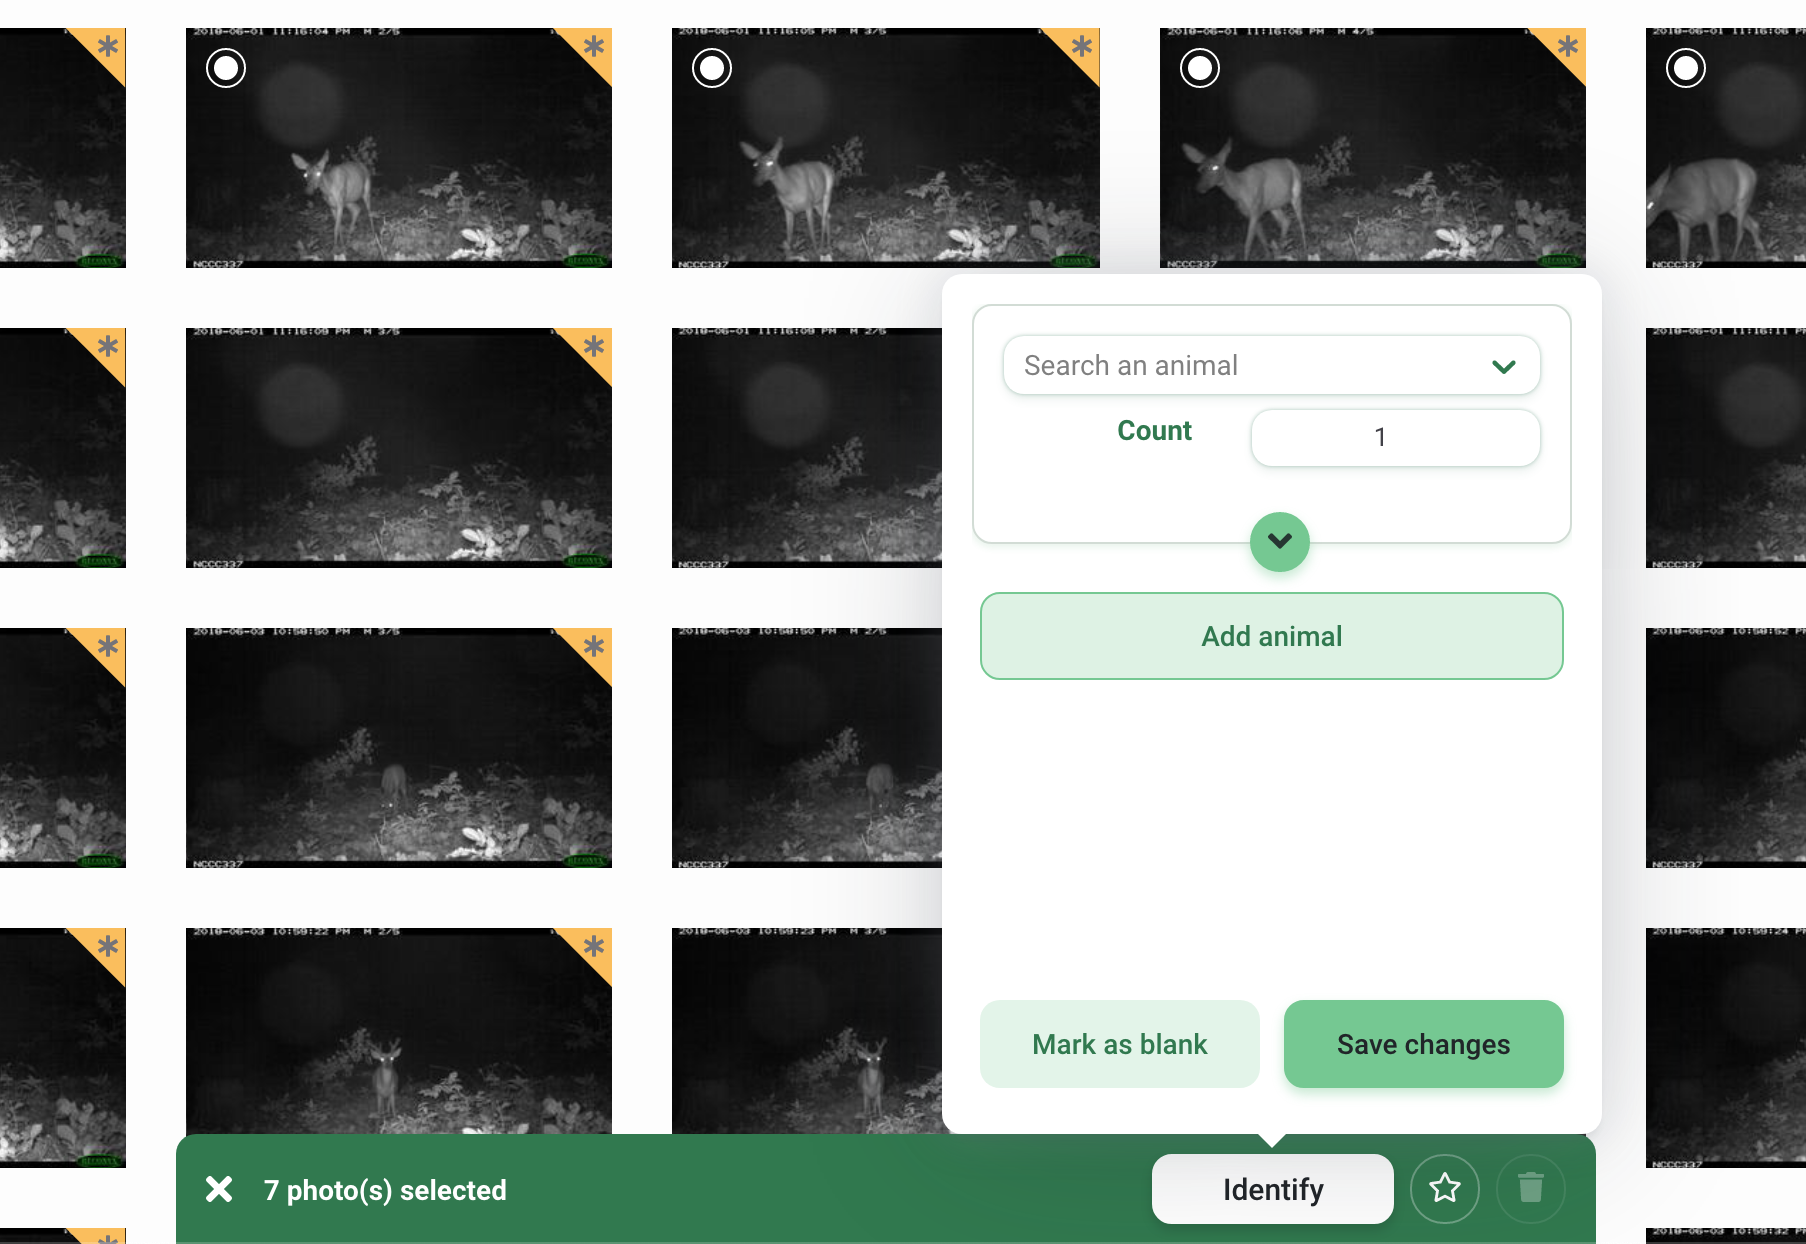
Each image selected will display a white circle in the top left-hand corner of the thumbnail image. Once images are selected in thumbnail view, a green bar will appear at the bottom of the screen, where you can:
- View the number of images selected
- Click the Identify button to assign an identification, count, or additional details, mark as blank or add an animal to all images selected
- Favorite all images selected
- Delete all images selected
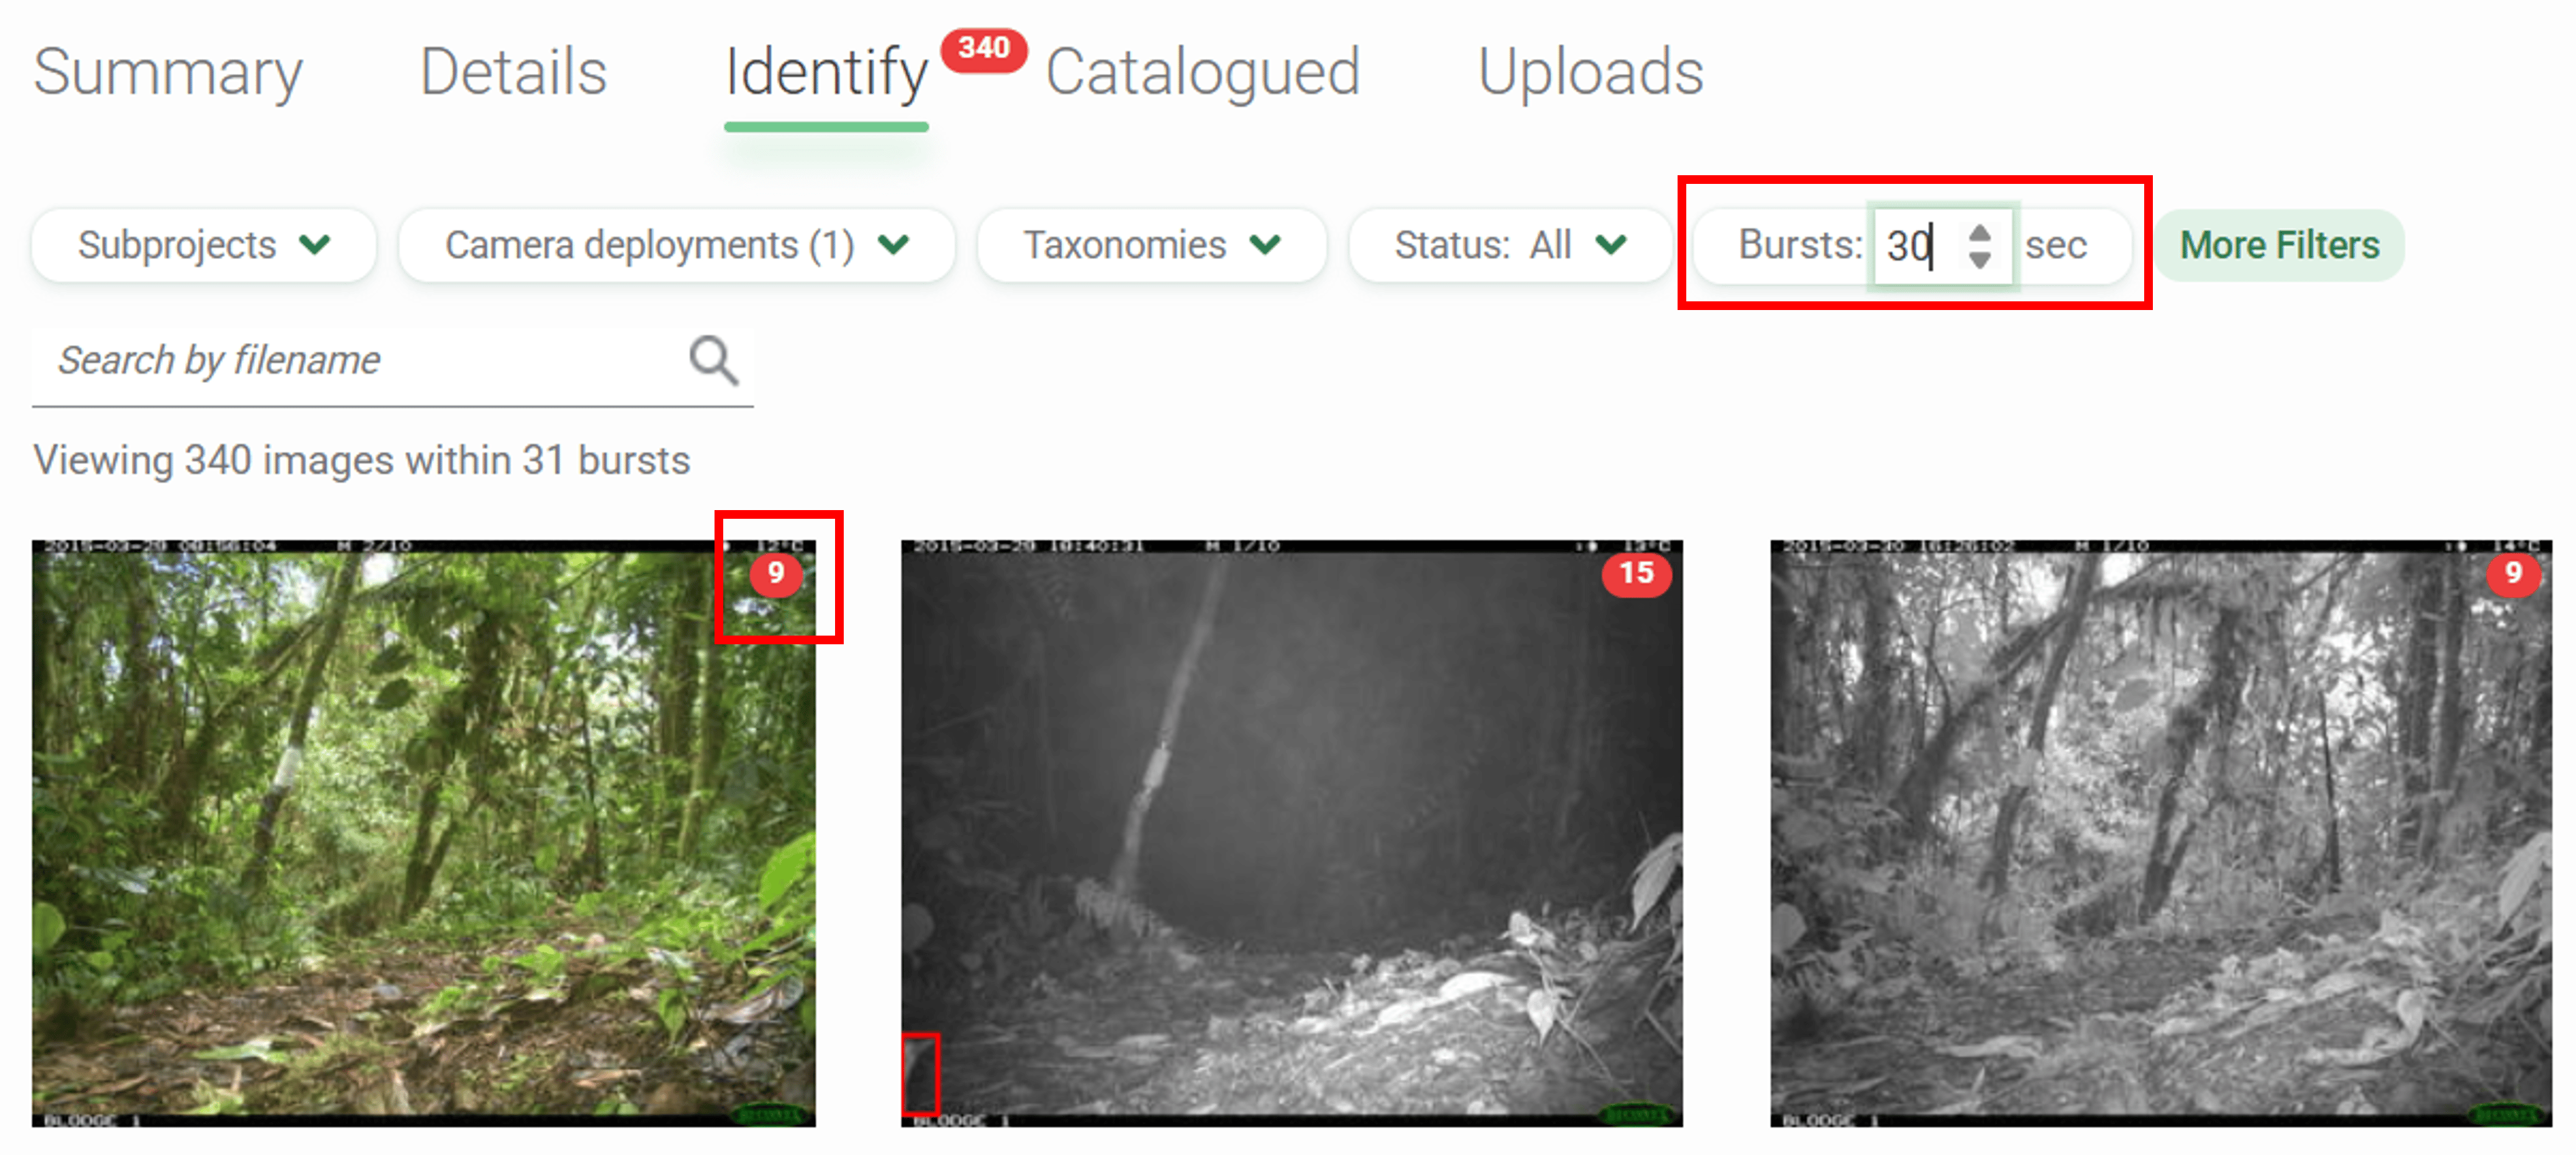
Use Bursts
In many instances, groups of images are taken within a short time frame from one another. These sets of images may include the same individual animals or objects. In this case, assigning the same identification to the entire set of images (called bursts in Wildlife Insights) at once can save a lot of time!
You can view images in Burst mode by entering a time interval in the Burst field. Enter any number of seconds from 0 to 600. The number of seconds refers to the time between an image and a subsequent image. For example, if a Burst selection of 30 seconds is entered, all images taken within 30 seconds of the subsequent image will be grouped together.
The number of images within a burst will be displayed in a red circle in the top right-hand corner of an image. Click on a burst group to view the images within that burst.
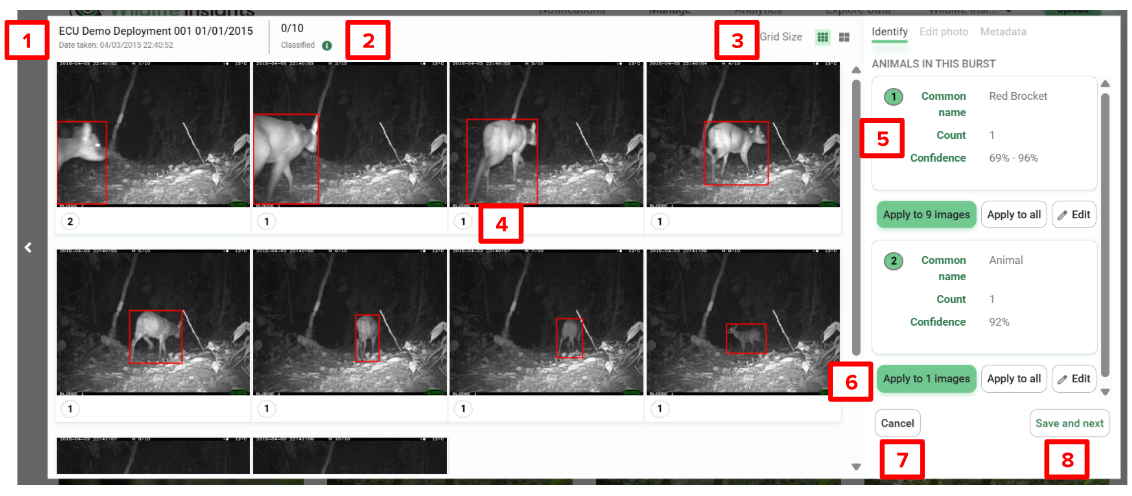
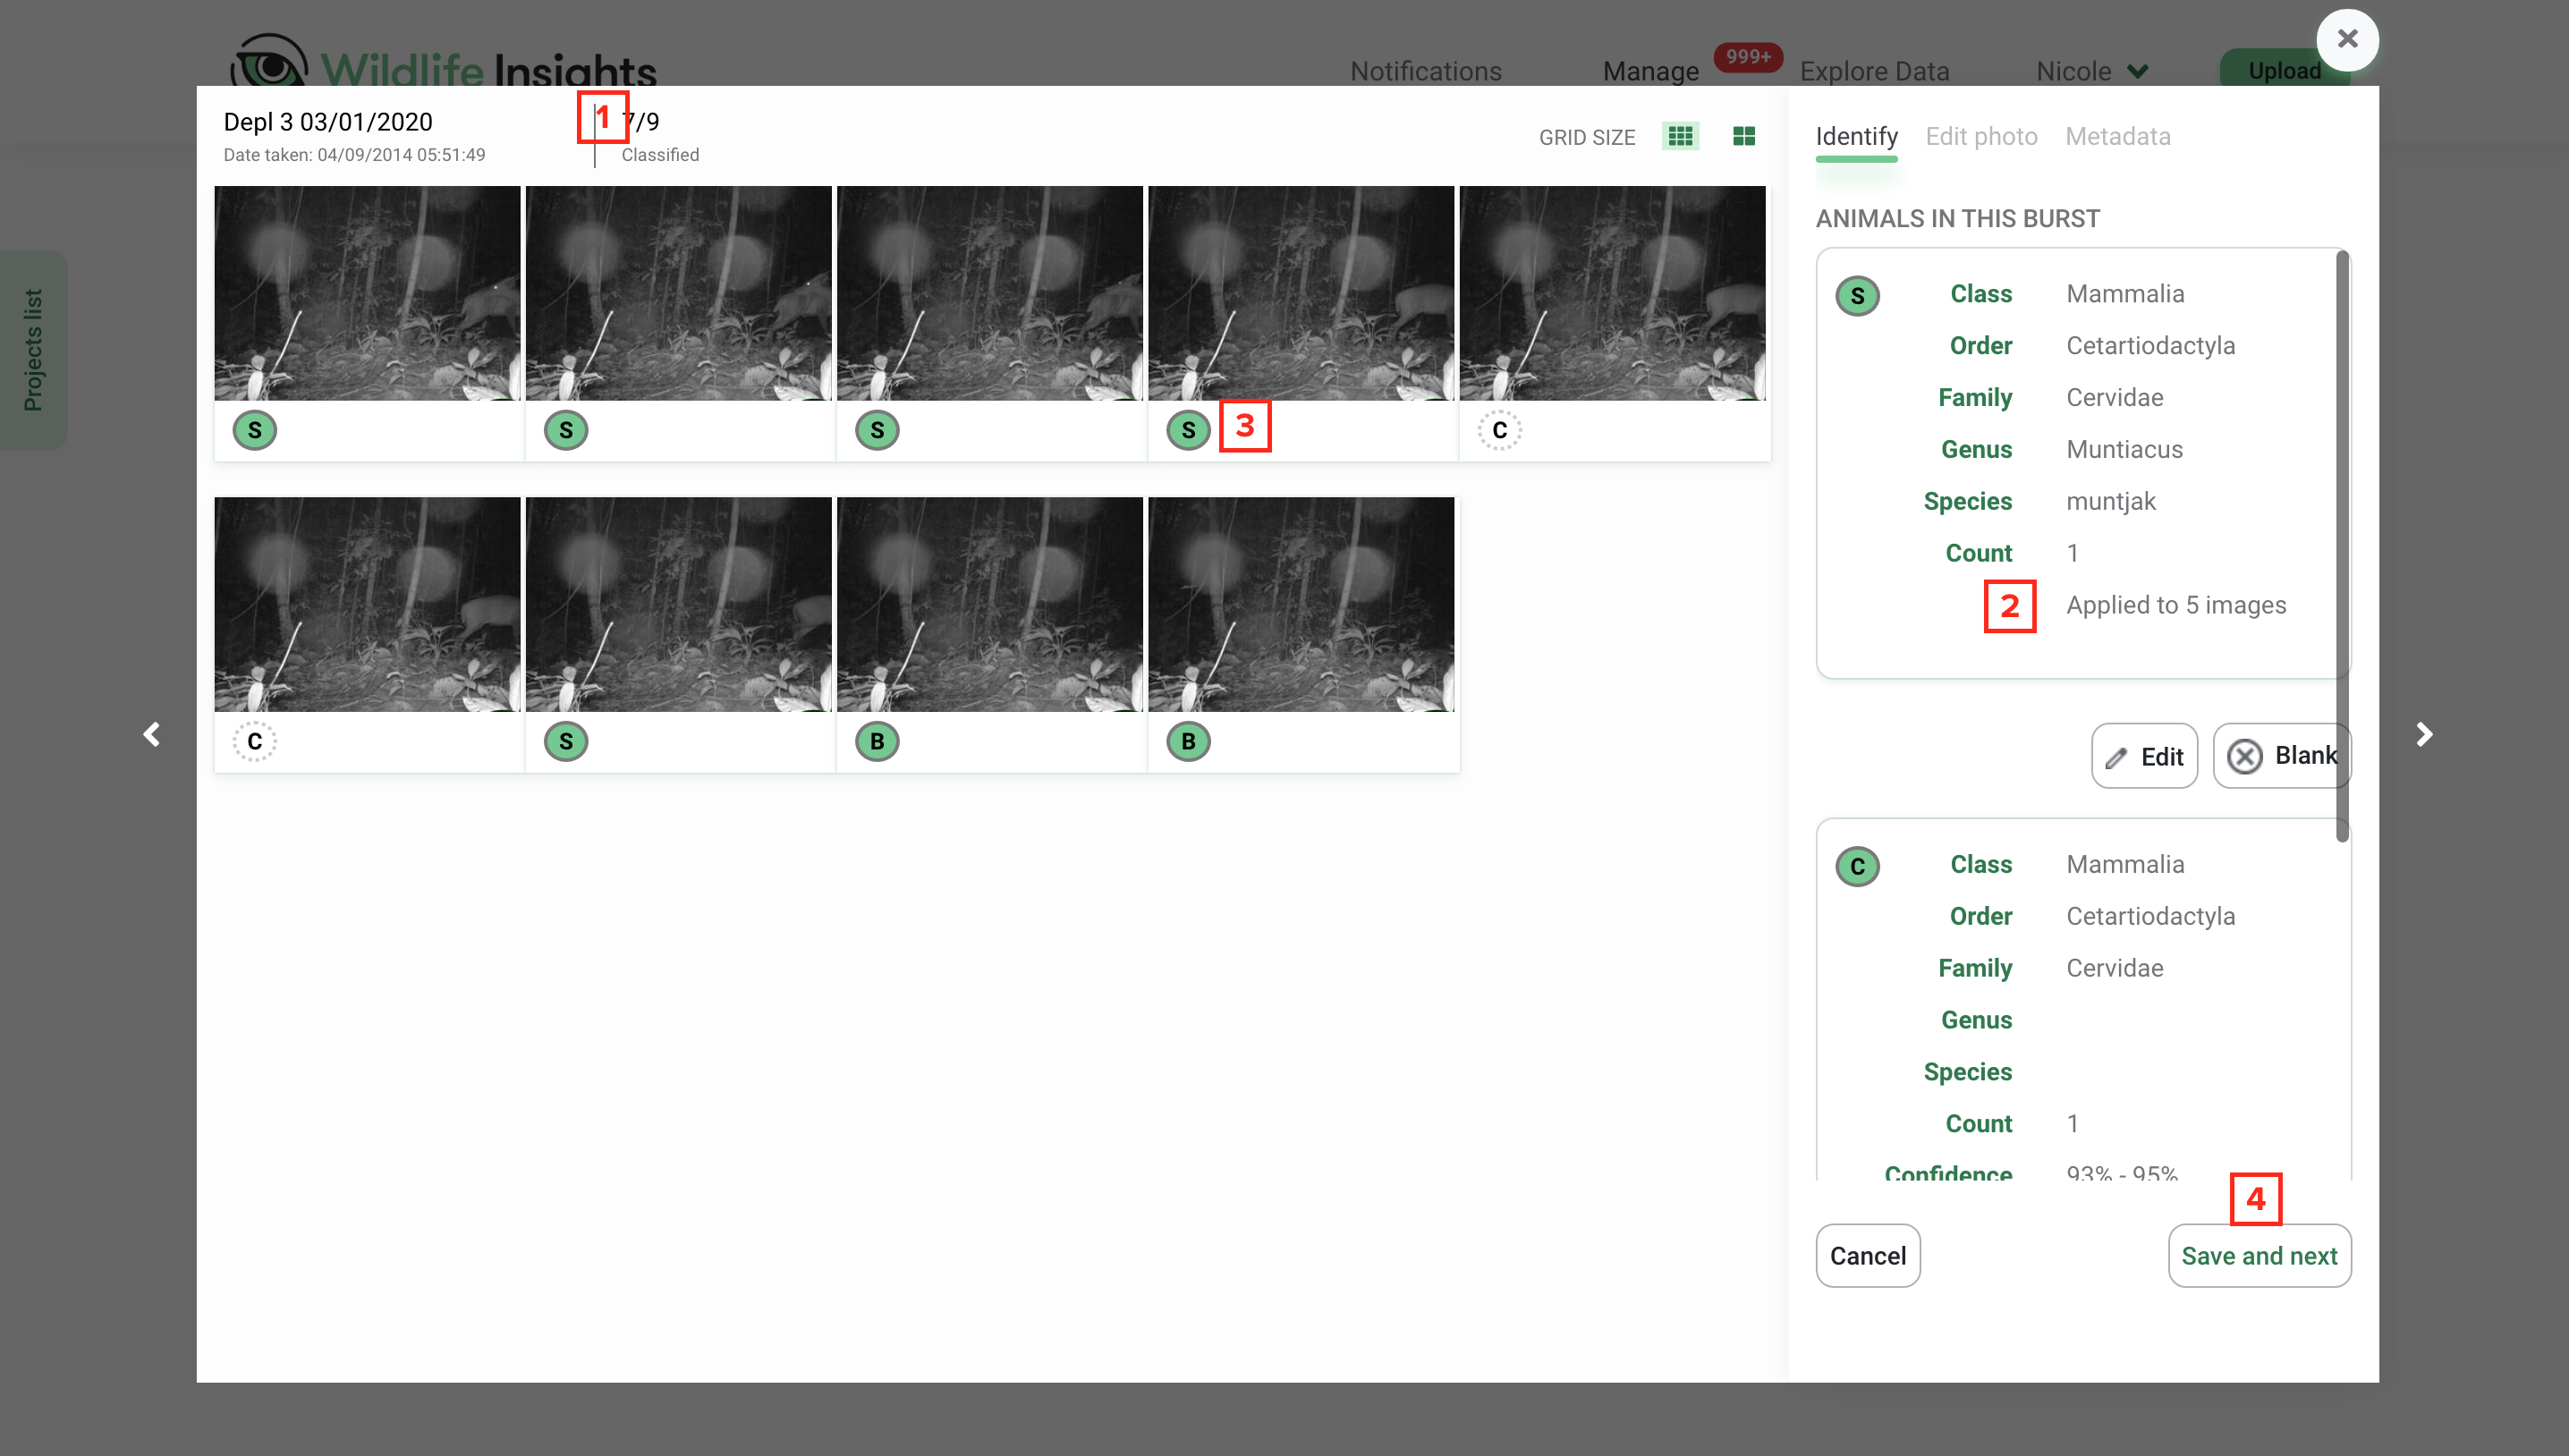
Once the burst opens, you’ll see all of the images in the burst in a small thumbnail preview. Let’s review the major components of this interface:
- View the deployment name and timestamp of the first image
- Track progress in the burst in the Classified section. The numerator shows the number of images whose identification has been confirmed or edited. The denominator shows the total number of images in the burst.
- Change the grid size from a small thumbnail to a medium thumbnail. You can also double-click on any image to view a large single image preview. Scroll to view more images in the thumbnail view.
- ID tokens are assigned to identifications in an image. A white token with a dotted outline indicates that the computer vision model has predicted an identification for that image, but the identification has not been confirmed by a user.
- View the full identification associated with an ID token in the identification panel on the right side of the screen.
- The buttons below any identification allow you to confirm or edit the identification associated with an ID token.
- Click the green Apply to ## images button to apply and confirm the ID for all images associated with the ID token.
- Click the green Apply to all button to apply that identification to all images in the burst
- Click Edit to edit the identification. If edited, the edits will be applied to all images associated with the ID token.
- Click Cancel to exit the burst view. If this button is selected, no changes will be saved.
- Click Save and Next to save changes and move the entire burst to the Catalogued tab. The next burst will be opened automatically.
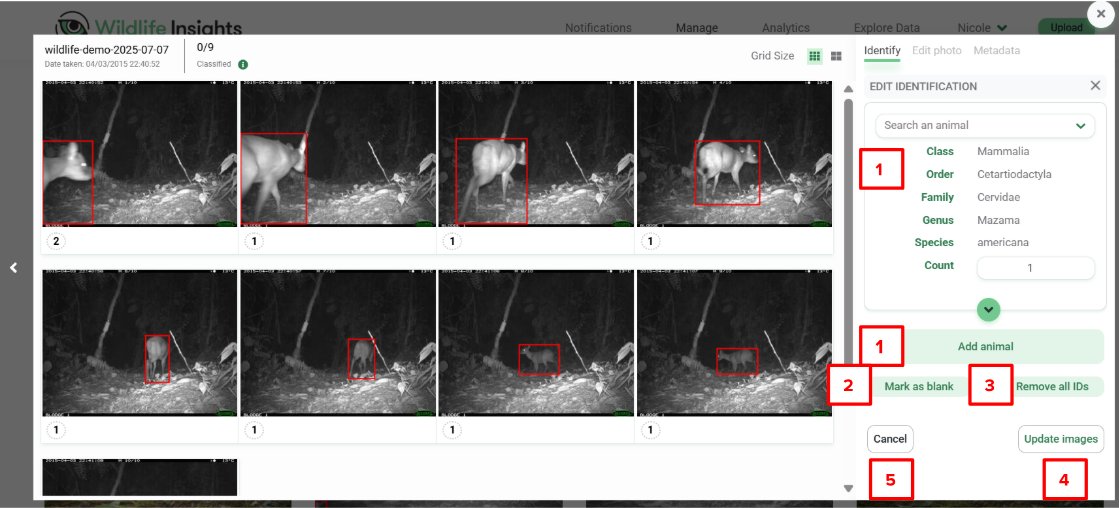
Edit an existing identification in a burst
- Edit the identification by modifying the existing identification or adding additional animals.
- Click Mark as Blank to mark all images associated with the ID token as blank.
- Click Remove all IDs to remove all identifications associated with the ID token within the burst.
- Click Update images to save your edits and update the identifications. Any changes will apply to all the images associated with the ID token.
- Click Cancel to return to the default burst view. You can also press the X to return to the default burst view.
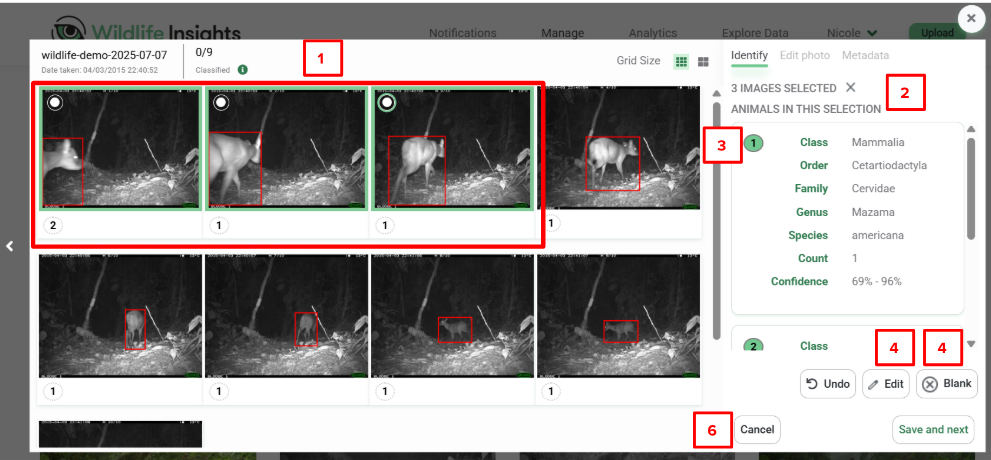
Bulk selections within a burst
- You can select groups of images within a burst using bulk selection keys (e.g.,
Ctrl+A(Cmd+Ain macOS) to select all, drag and select). The images selected will be highlighted in green. - The number of images selected will be displayed in the identification panel.
- All identifications associated with the selected images will be displayed.
- You can edit the identification or click Blank to mark the images as blank.
- Click Update images to save your edits and update the ID. Any changes made will apply to all the images selected.
- Click Cancel to exit the burst view and return to the Identify tab.
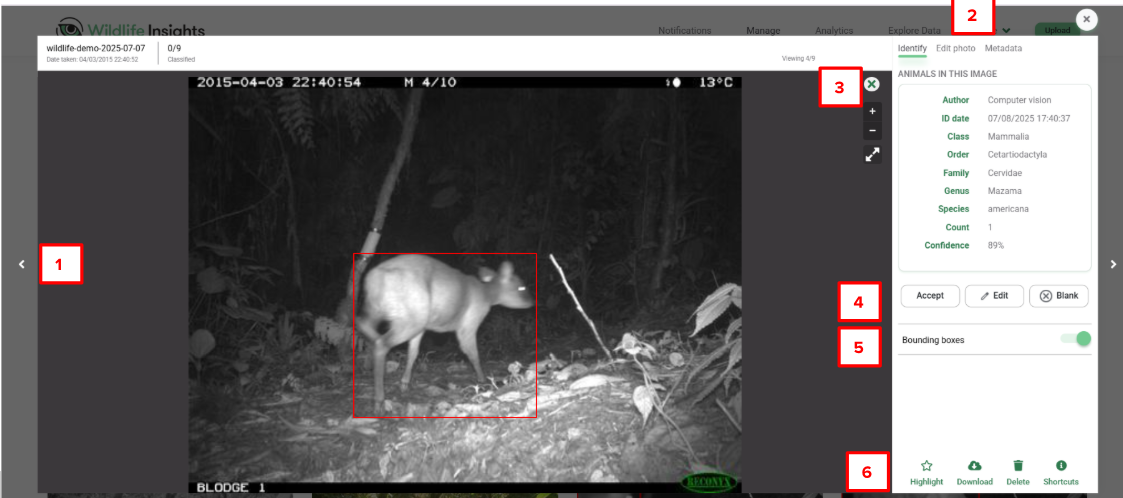
Single image view within a burst
You can double-click on any image to view a large preview of the image. Within this screen, you can edit the image identification as needed. Note: if you save the identification in this single image preview, the image will be moved to the Catalogued page, and the rest of the burst will remain.
- Use the left and right arrows (or the arrows on your keyboard) to move back and forth between images in the burst.
- The Edit Photo and Metadata tabs are activated when viewing a single image. Use these tools to modify or view more information about the single image.
- Close the single image preview by clicking on the X button.
- Use the Accept, Edit and Blank buttons to edit the identification of the single image.
- You can choose to view or hide bounding boxes.
- Highlight the image. The highlight will apply only to the single image.
Review progress in bursts
- When you confirm an identification, the image moves from the burst to the Catalogued tab, and the denominator reduces in the Classified section.
- The identification panel will also show the number of images to which the identification ID has been applied.
- An identification confirmed by a user will be displayed as a green token.
- Press Save and next to move all the images in the burst to the Catalogued page. The next burst will open automatically.
 Back to the guide