Deployments
A camera deployment refers to the setup of a camera at a location (latitude, longitude) during a specific period of time. Multiple camera deployments can be associated with one location, which may be true for many projects that conduct multi-year sampling efforts.
SKIP AHEAD TO
Create a Camera Deployment during image upload
Create a Camera Deployment in Project Details
Bulk Camera Deployment uploads
Edit an existing Camera Deployment
Create a Camera Deployment during image upload
Camera deployments can be created when you upload images into Wildlife Insights. On the upload screen, you’ll be prompted to choose a project to upload the images to. If you would like to create a new camera deployment:
- Select the green New deployment button
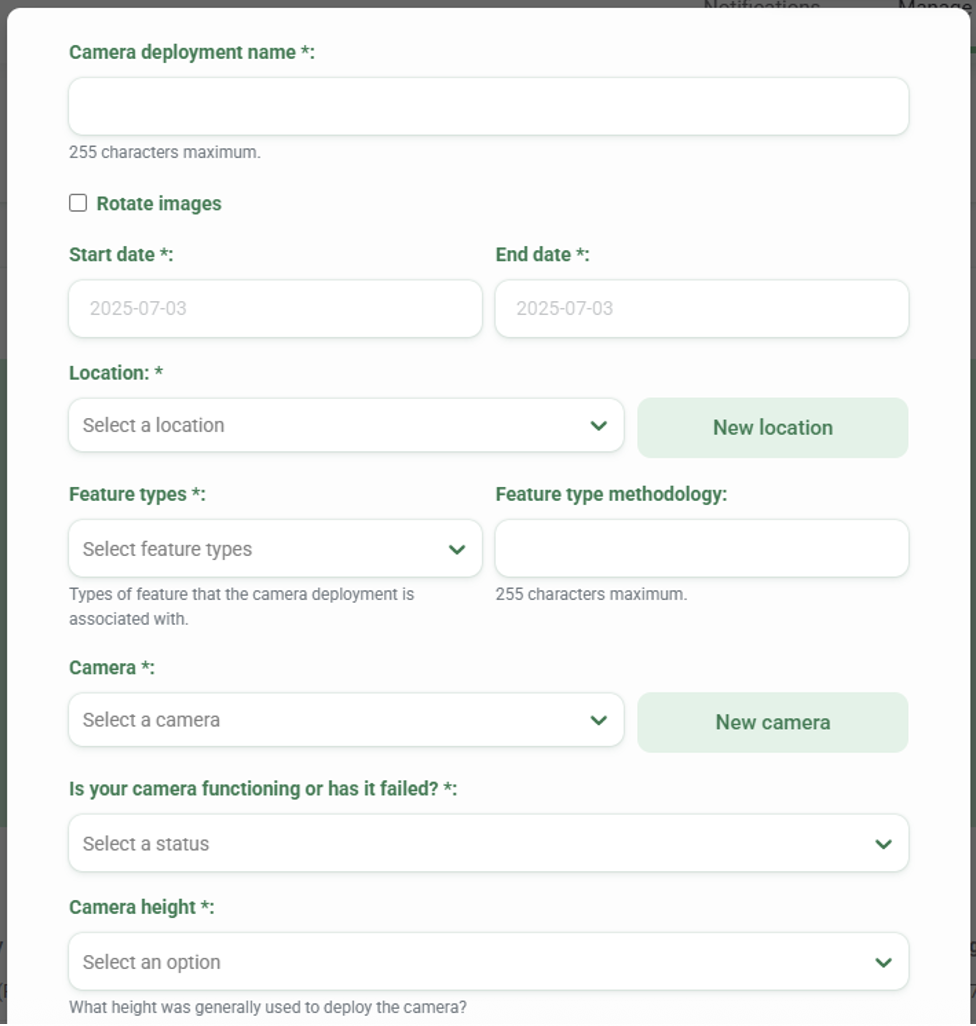
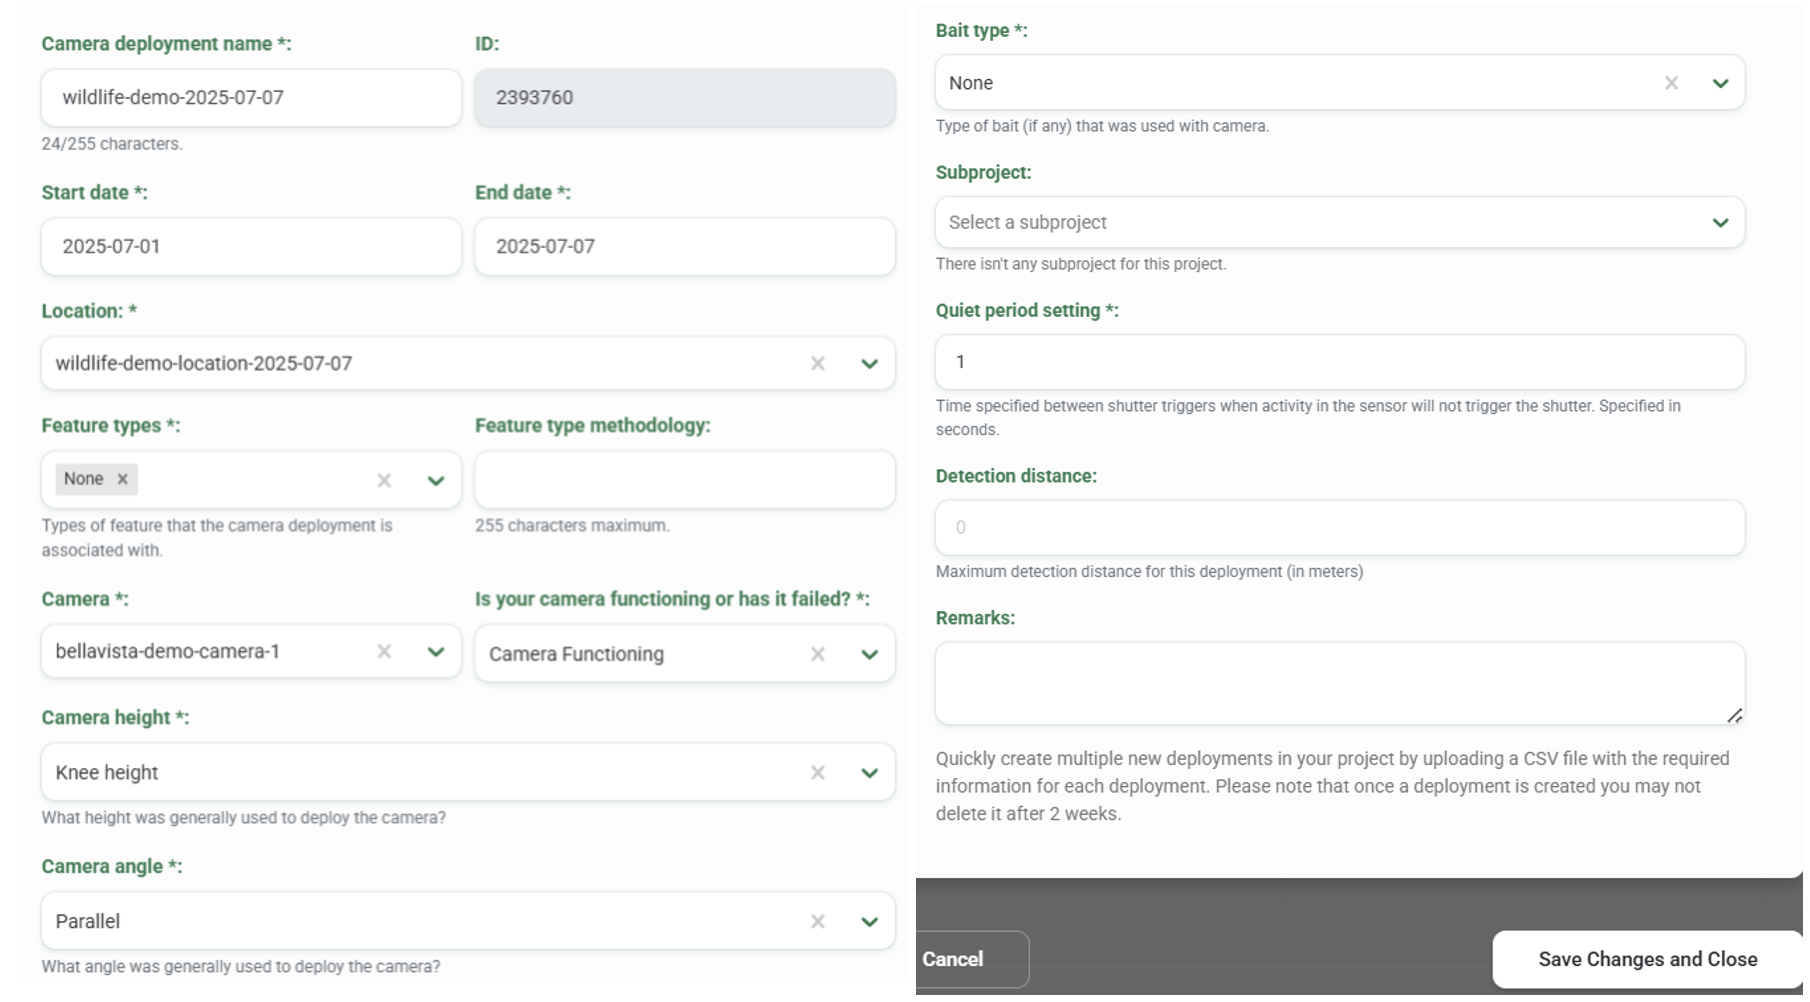
- Fill out the New deployment form. Required fields are marked with an asterisk.
- Camera Deployment Name* - A unique name for your deployment
- Start date* - The date the camera was activated and started recording observations. This also marks the date a new SD card was inserted into a camera that is continuously operating (YYYY-MM-DD).
- End date* - The date the camera was picked up, OR the date the SD card was retrieved (YYYY-MM-DD).
- Location* - Select an existing location or create a new location
- Feature types* - Select the type of physical feature, such as burrow, nest site, or water source, that the camera deployment is associated with. If the deployment is not associated with a specific feature type, select None.
- Feature type methodology - Describe details about the feature type
- Camera* - Select an existing camera or create a new camera
Is your camera functioning or has it failed?* - Was the camera functioning when it was picked up? - Camera height* - The height at which the camera was deployed. If Other, enter supporting details in the supplementary Camera height details field.
- Camera angle* - What angle was the camera set
- Bait type* - Select the type of bait used with the camera, if any. Note: There is also a project-level Bait type entry. If you enter Bait type= None at the project level, you cannot enter any bait type for any deployment within that project. If you would like to enter a bait type in a deployment, you must change the Bait type entry in Project Details.
- Subproject - If applicable, select the subproject that the deployment belongs to A subproject is a specific grouping of camera deployments (e.g., by year, location or strata) within a project. Learn more about Subprojects.
- Quiet period setting* - If the camera was set to trigger at a given interval, you can specify the time interval (in seconds) here. Otherwise, enter 0.
- Remarks - Any other notes about the deployment. Note: These remarks are available in the public download from Wildlife Insights.
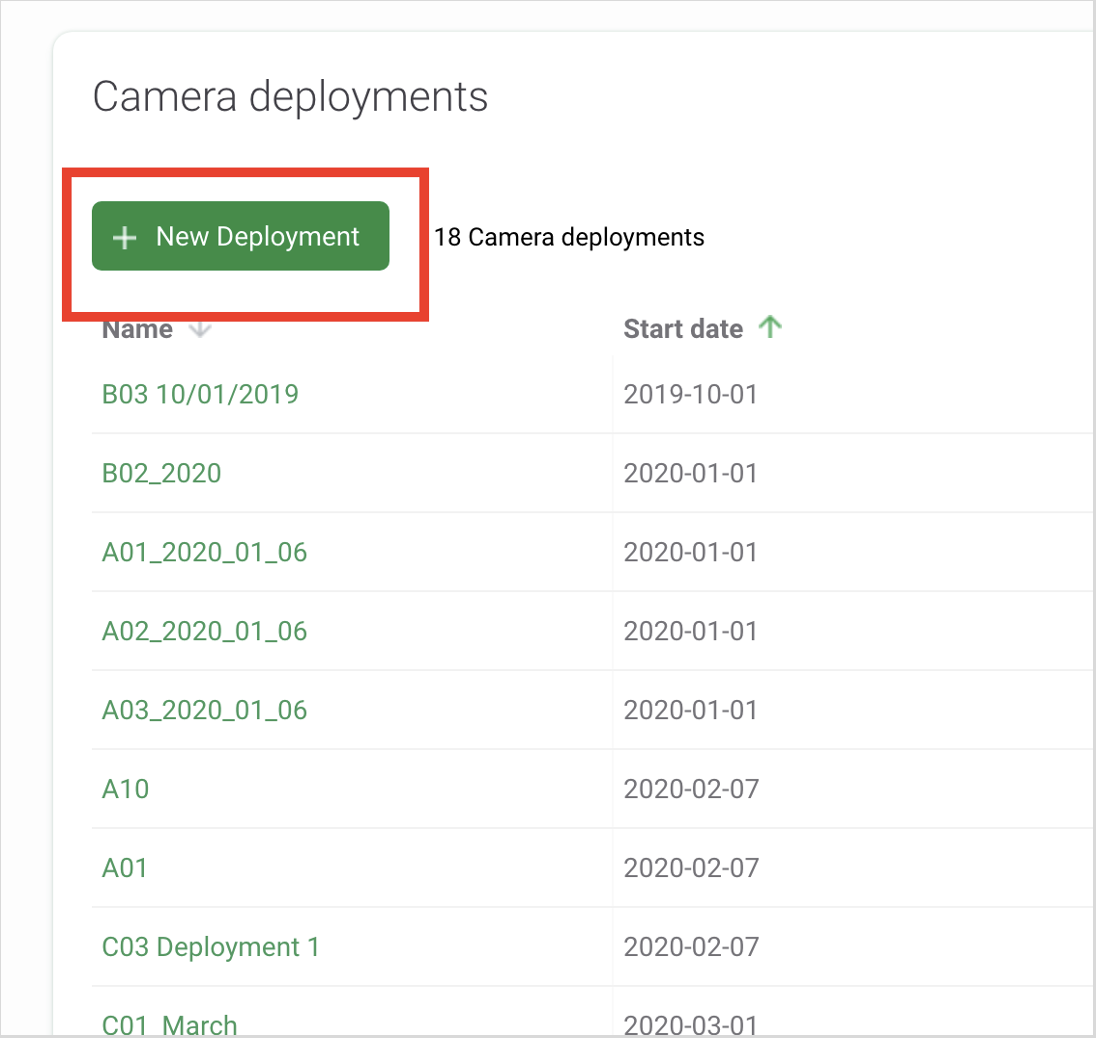
Create a Camera Deployment in Project Details
You can also create a deployment or several deployments before you begin uploading images. To create a deployment:
- Navigate to the Project Details tab
- Scroll to the bottom of the page
- You’ll find a table of Camera Deployments.
- Click on the green New deployment button
- Click Add deployment
- Fill out the New Deployment form. Required fields are marked with an asterisk.
- Click the white Create button to create a new deployment.
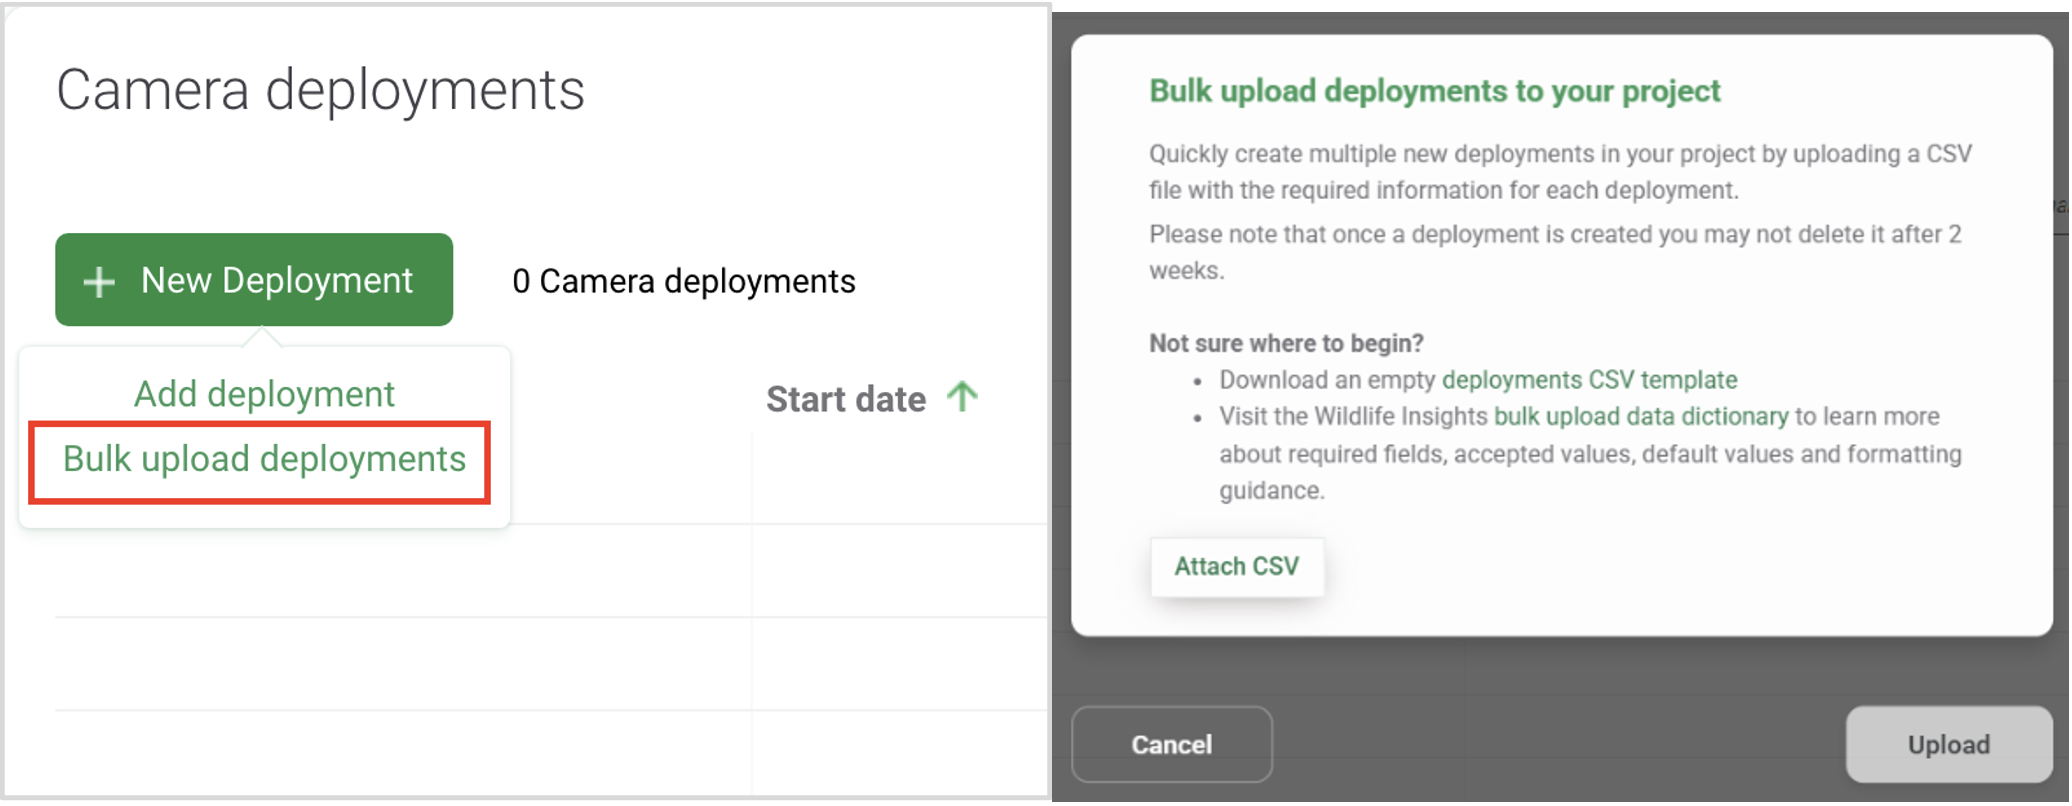
Bulk Camera Deployment uploads
You can create many deployments with just a few clicks by simply uploading a comma delimited file (CSV) template with the required information.
You can begin recording deployment information in a blank template as you set cameras out. Then, once you’re ready to upload images, you can save time by creating all your deployments in bulk!
- Download a blank CSV bulk deployment template and enter your deployment information into the template following the instructions in the Explainer tab.
- Navigate to the Project Details tab
- Scroll to the bottom of the page
- You’ll find a table of Camera Deployments.
- Click on the green New deployment button
- Click Bulk upload deployments
- Click Attach CSV, navigate, and open your completed CSV bulk deployment template
- Click the Upload button
- If the upload fails, check the generated report for details and correct the problems.
Edit an existing Camera Deployment
To edit an existing deployment, click the green Edit button to the right of any deployment record.
Once your edits have been made, click on Save Changes to save your edits.
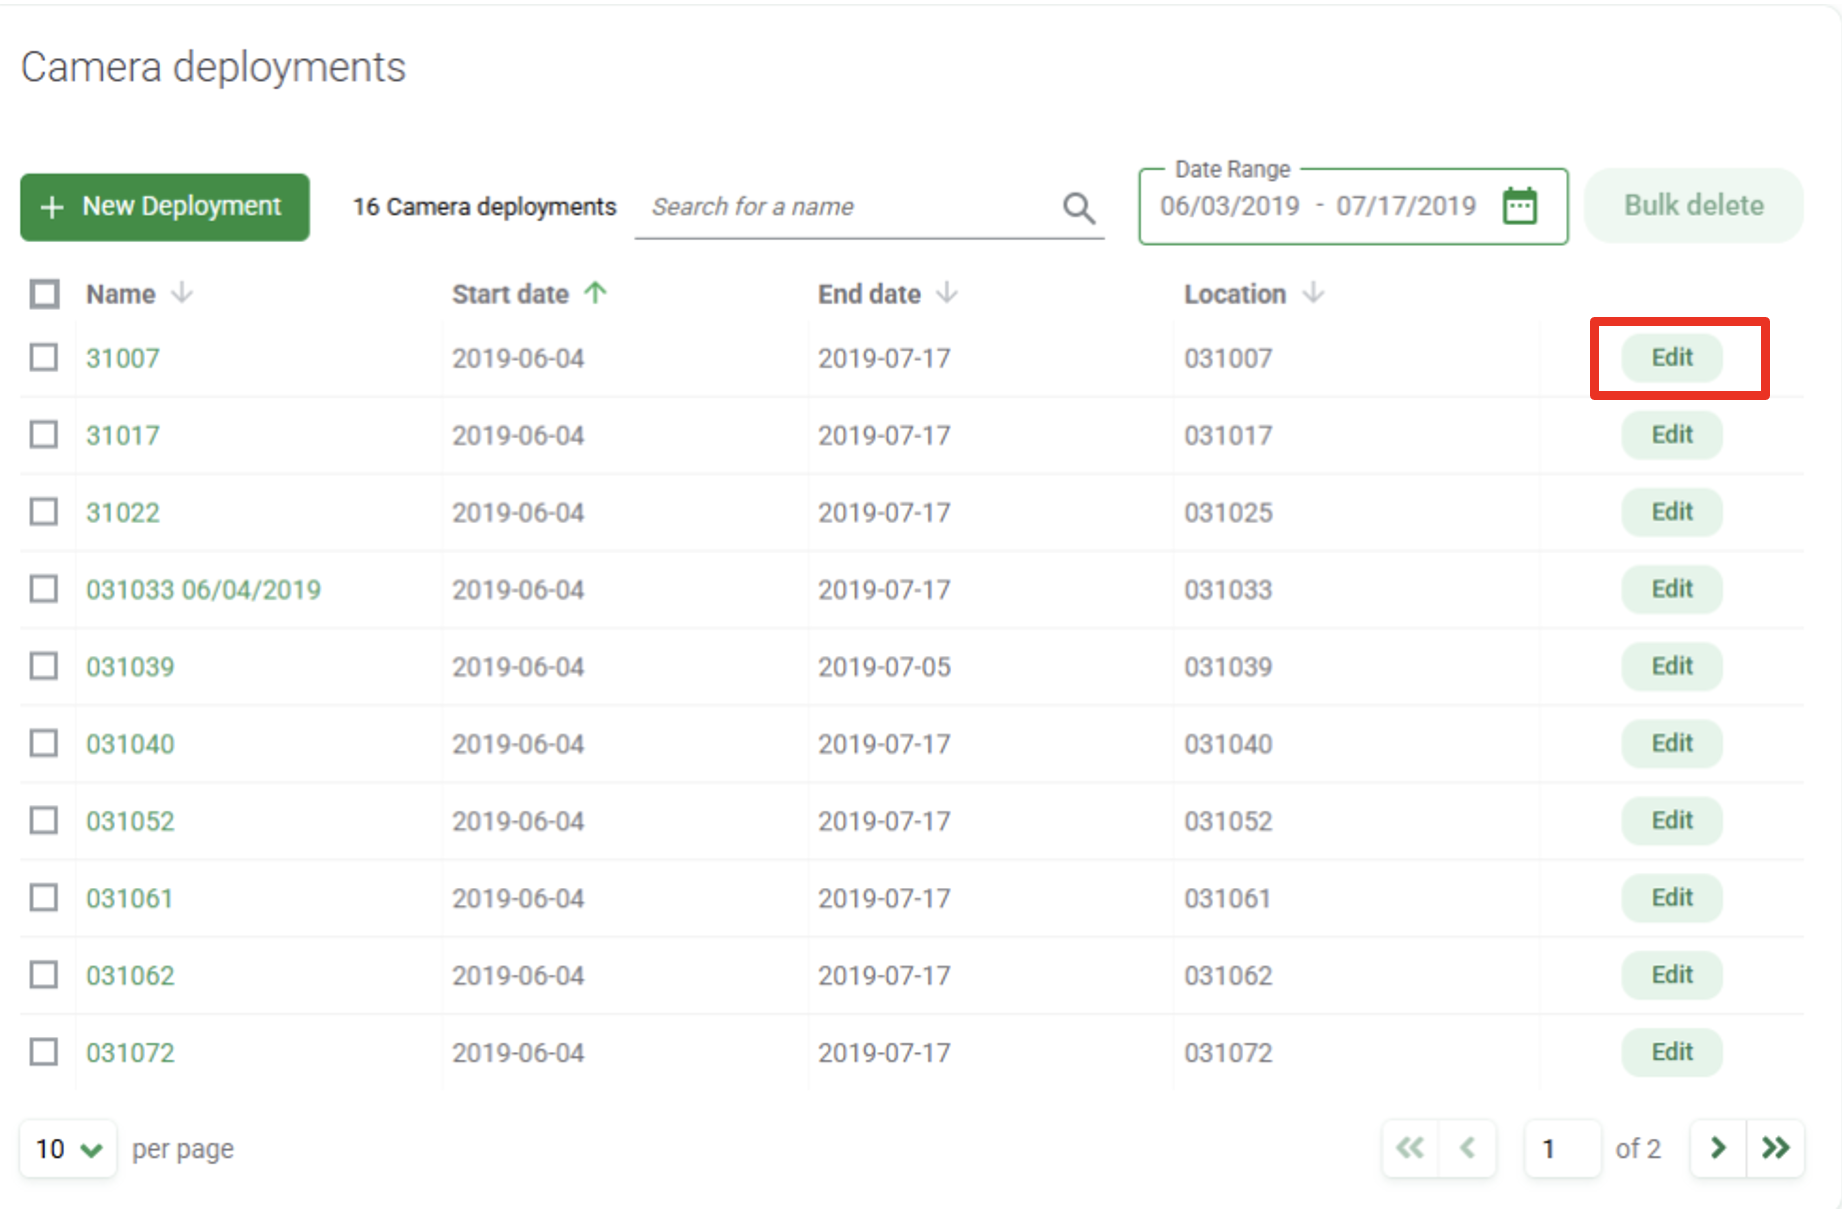
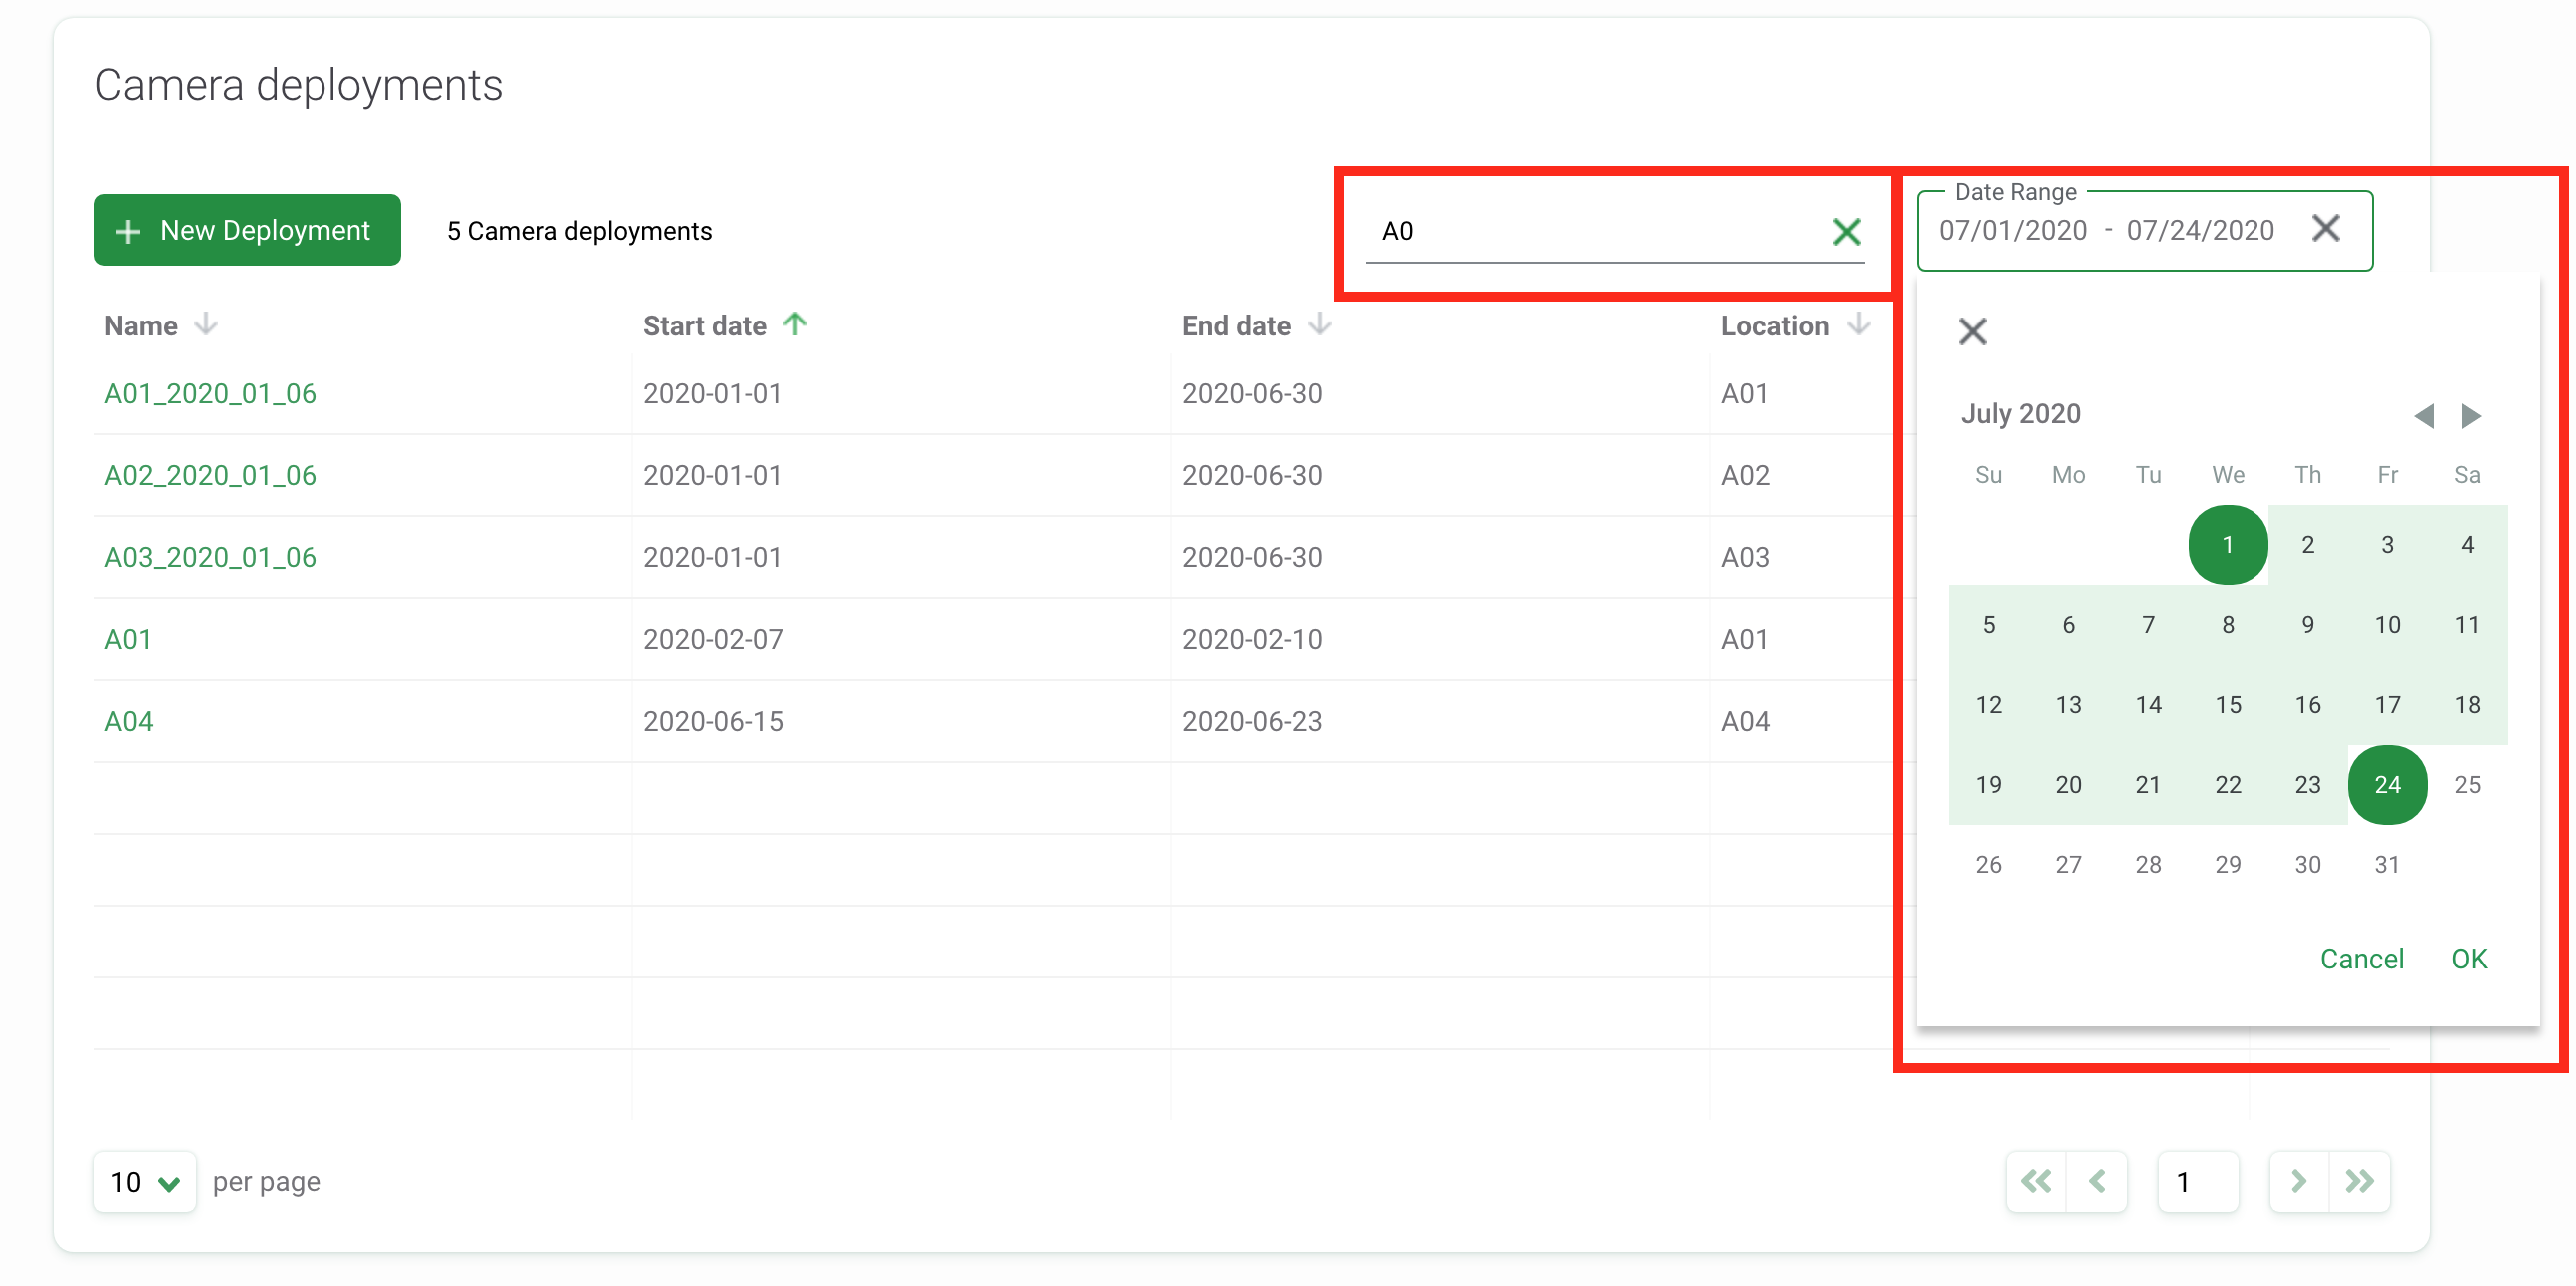
Search for a Camera Deployment
Search for a camera deployment by name by typing in criteria in the search box in the right-hand corner of the camera deployments table.
You can also filter camera deployments by date range. Type in a start date and end date or use the pop-up calendar to select a date range.
The number of results that match the search/filter criteria appears next to the New Deployment button.
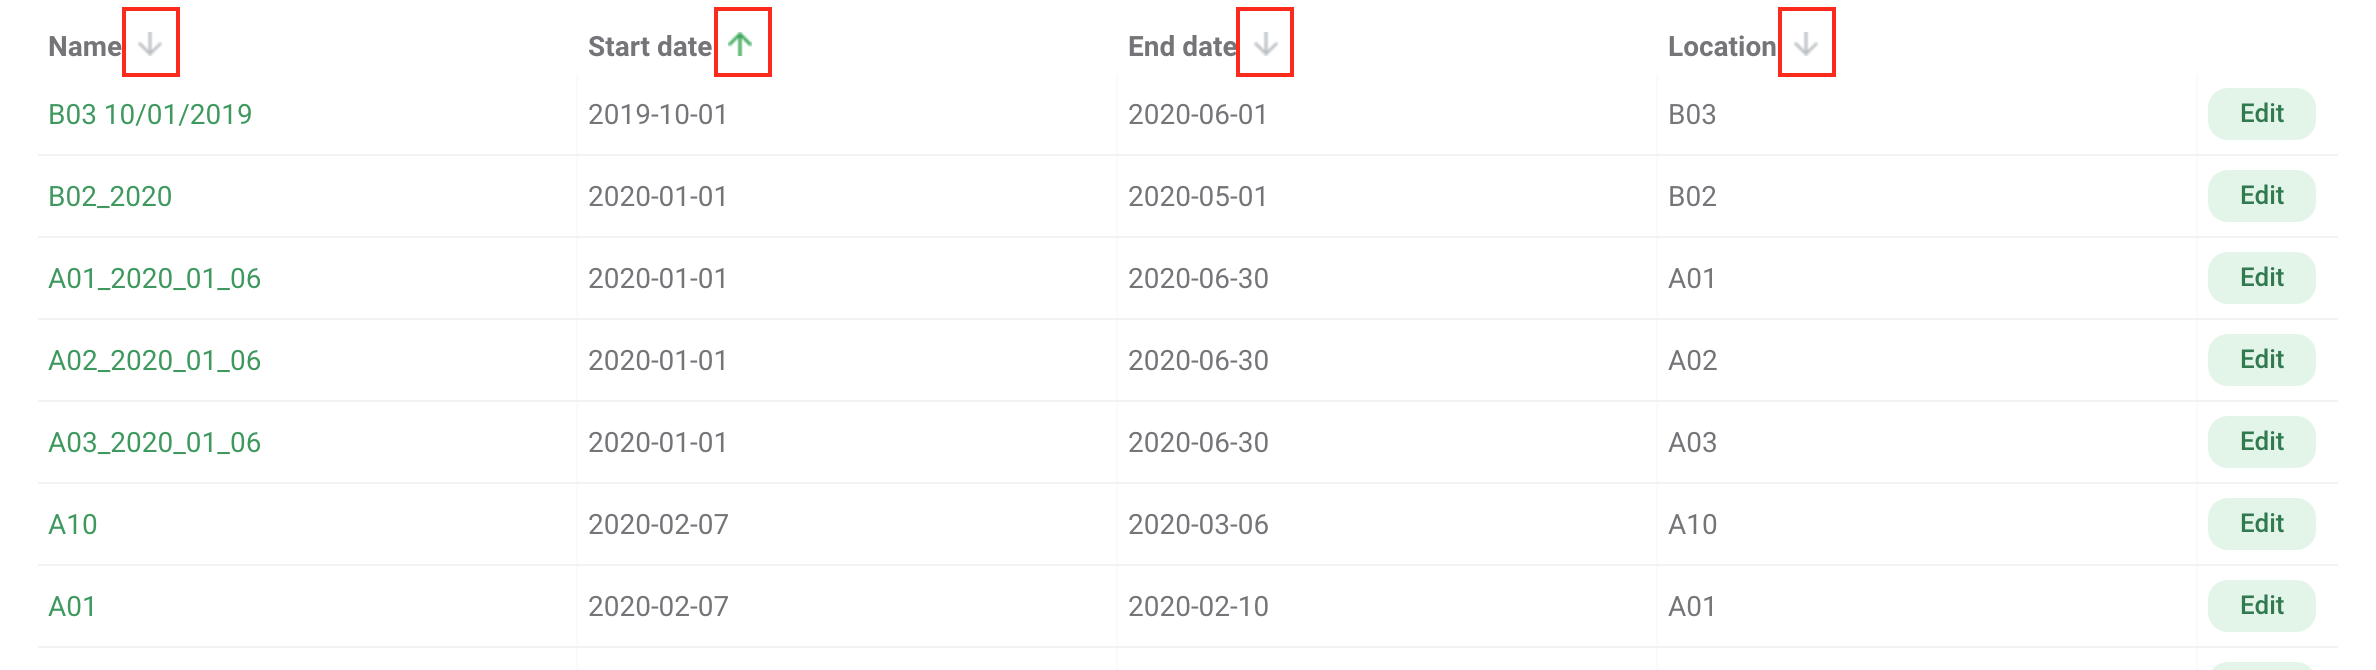
Sort Camera Deployments
There are a variety of ways to help you sort and filter your camera deployments. Simply click on the arrow next to a column header to sort by that column.
You can sort by:
- Name
- Start date
- End date
- Location name
The column used to sort deployments will display a green arrow next to the column header. You can sort by ascending or descending criteria.
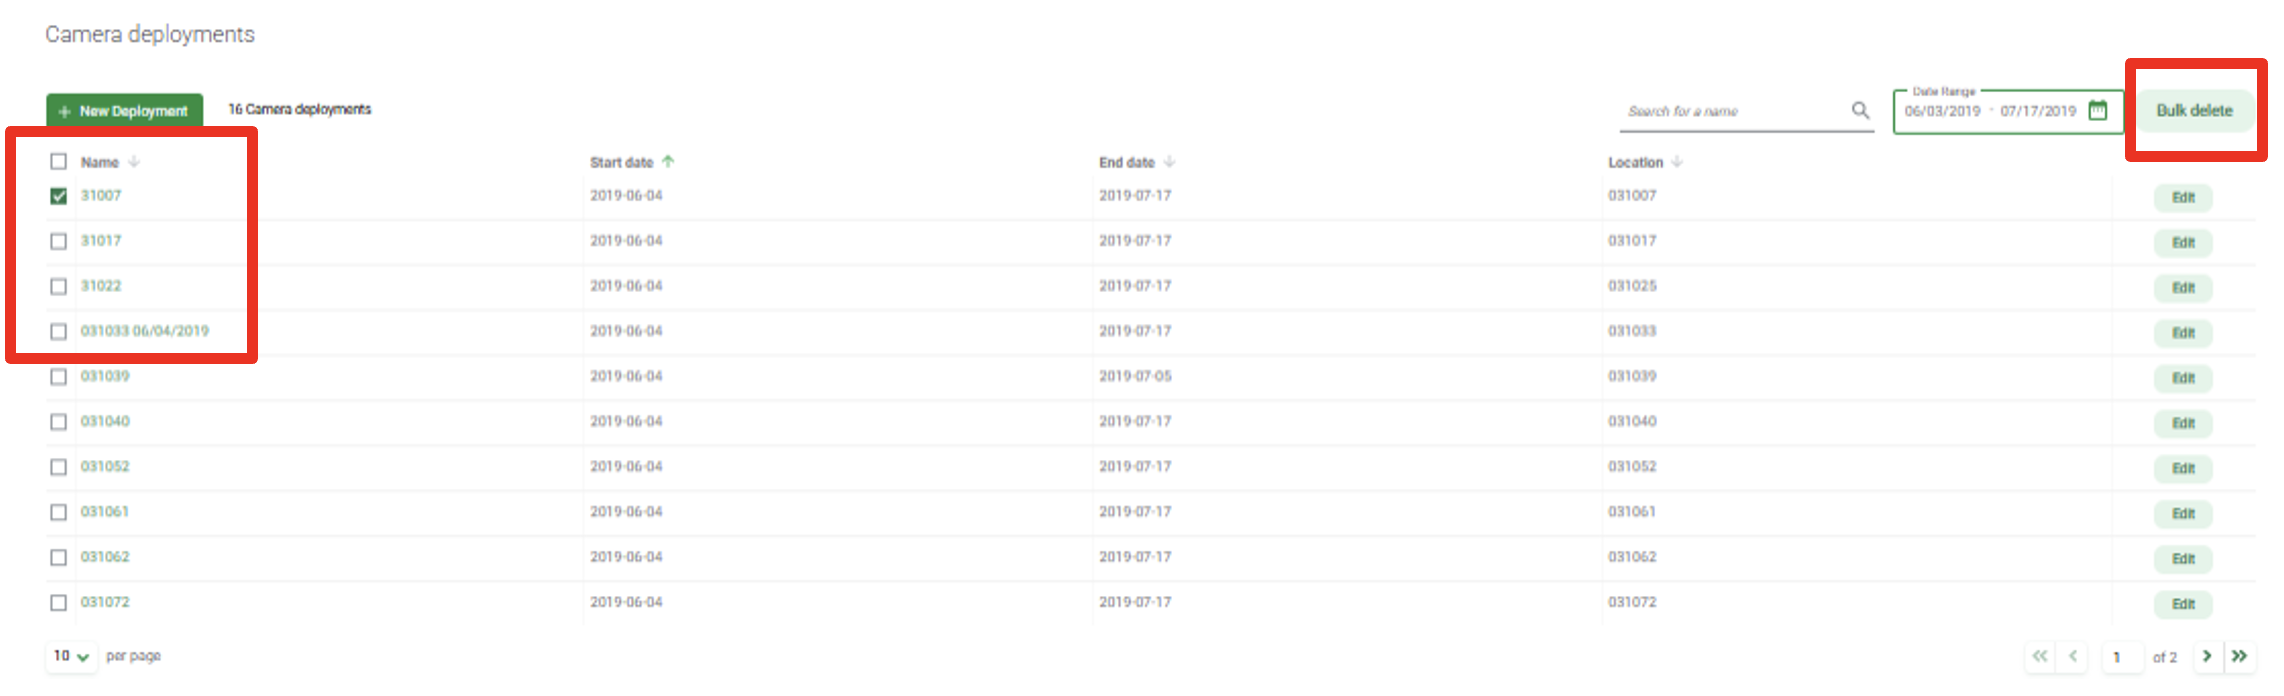
Deleting a Camera Deployment
To delete a camera deployment, you must be a Project Owner or Editor. Click the green Delete button to the right of the camera deployment record. If you are a Project Owner, you can delete multiple camera deployments at once by selecting the camera deployments to delete and clicking the green Bulk Delete button.
WARNING: Once a camera deployment is deleted, all of the images associated with that camera deployment will be deleted from your project. The Location and Camera associated with the deployment will remain part of your project.

 Back to the guide